Here’s a stat that should worry you: 73% of SaaS companies experience payment integration failures in production, according to recent developer surveys. Not because the APIs are broken — but because the integration wasn’t built to handle real-world complexity.
I’ve seen it happen. A startup launches their SaaS, payments work perfectly in testing, then on day three in production, webhooks start failing silently. Customers are charged but don’t get access. Support tickets pile up. The founder is debugging at 2 AM while angry users tweet about being scammed.
Payment API integration isn’t just about making a POST request and calling it done. It’s about building a system that handles network failures, duplicate webhooks, idempotency, and security — all while keeping your checkout experience smooth.
What Is Payment API Integration?
Payment API integration is the process of connecting your SaaS application to a payment processor’s API to handle transactions programmatically. This includes charging customers, managing subscriptions, processing refunds, and handling webhook notifications for async events.
But here’s what most tutorials won’t tell you: the API integration itself is maybe 30% of the work. The other 70% is handling edge cases, security, and making sure your system stays consistent when things go wrong.
Why Payment Integration Breaks in Production
Before we dive into implementation, let’s understand why payment integrations fail. Based on my experience and data from processing millions of transactions, here are the top failure modes:
- Webhook timeouts: Your endpoint takes too long to respond, so the payment provider retries — creating duplicate processing
- Missing idempotency: The same charge request gets sent twice, and you bill the customer twice
- Failed signature verification: You process a webhook that didn’t actually come from your payment provider
- Database inconsistencies: Payment succeeds but your database update fails, leaving the customer without access
- Race conditions: Two webhooks for the same event arrive simultaneously and both get processed
Each of these is preventable with the right architecture. Let’s build it.
Step 1: Choose Your Integration Architecture
You have three main options for payment API integration:
| Architecture | Best For | Complexity | Control |
|---|---|---|---|
| Direct API Integration | Full control, custom flows | High | Complete |
| Embedded Checkout (Stripe Elements) | Quick implementation, PCI compliance handled | Medium | Limited |
| Merchant of Record (Fungies, Paddle) | Global tax compliance, minimal dev work | Low | Minimal |
For most SaaS companies in 2026, I recommend starting with an embedded checkout solution or a Merchant of Record. You can always migrate to direct API integration later when you have dedicated payment infrastructure engineers.
Step 2: Implement Authentication Correctly
Every payment API uses API keys for authentication. Here’s how to handle them securely:
Never Store Keys in Code
// ❌ WRONG — Never do this
const stripe = require('stripe')('sk_live_1234567890abcdef');

// ✅ CORRECT — Use environment variables
const stripe = require('stripe')(process.env.STRIPE_SECRET_KEY);
Use Separate Keys for Test and Production
This sounds obvious, but I’ve seen production databases wiped because someone ran a test script with live credentials. Use environment-specific keys and validate which environment you’re in before executing destructive operations.
Implement Key Rotation
Payment providers let you roll API keys without downtime. Do this every 90 days. If a key leaks, you can revoke it instantly without breaking production.
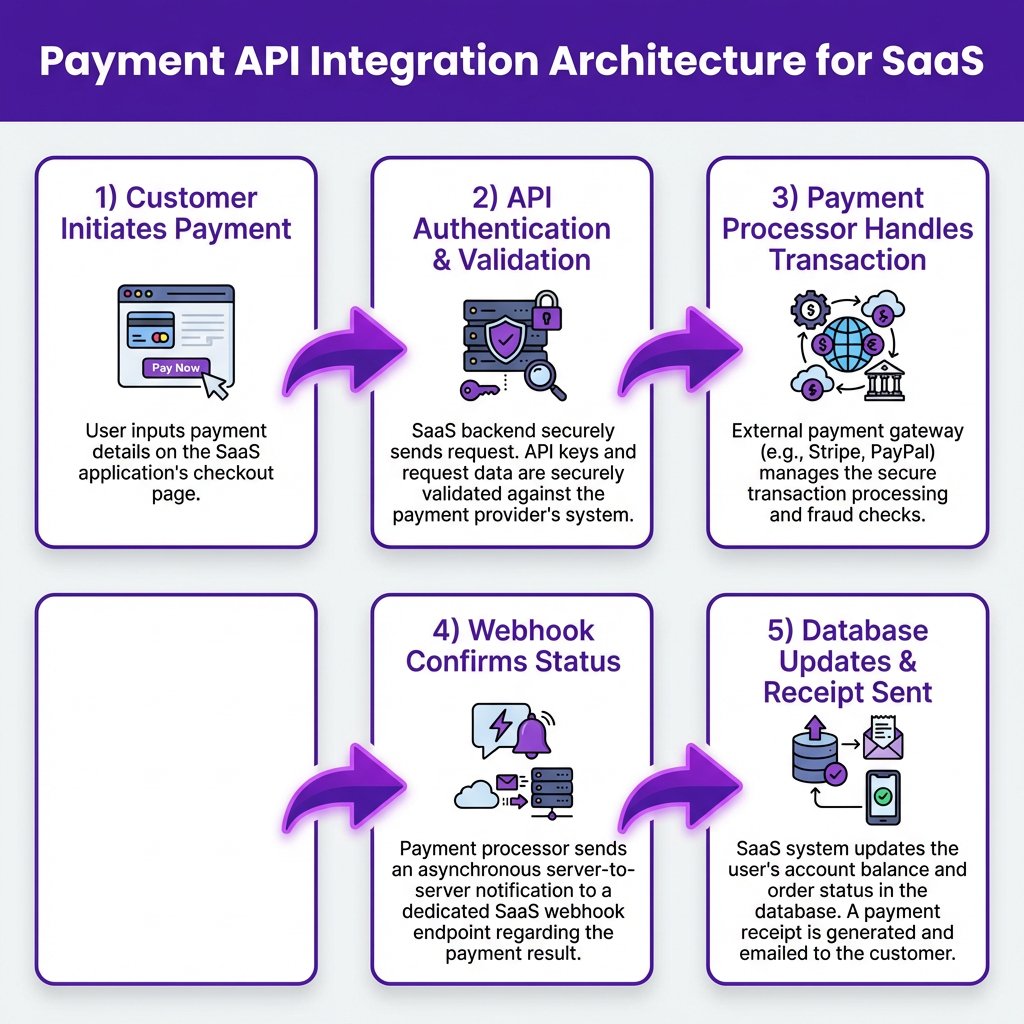
Step 3: Handle the Payment Flow
Here’s the standard payment flow for a SaaS subscription:
- Customer selects plan and enters payment details
- Your backend creates a payment intent/subscription
- Client confirms the payment (3D Secure, etc.)
- Payment provider processes the transaction
- Webhook notifies your system of success/failure
- You provision access and send confirmation
The critical part is step 5. Never rely on the client-side confirmation alone. Always wait for the webhook before provisioning access. Client-side JavaScript can fail, be blocked, or be manipulated.
Step 4: Build Idempotent Endpoints
Idempotency is the property that calling an operation multiple times has the same effect as calling it once. For payments, this is non-negotiable.
// Example: Idempotent charge creation
app.post('/api/create-subscription', async (req, res) => {
  const { planId, paymentMethodId, idempotencyKey } = req.body;

  // Check if we've already processed this request
  const existing = await db.subscriptions.findOne({ idempotencyKey });
  if (existing) {
    return res.json({ subscriptionId: existing.id, status: 'already_processed' });
  }

  try {
    const subscription = await stripe.subscriptions.create({
      customer: req.user.stripeCustomerId,
      items: [{ price: planId }],
      default_payment_method: paymentMethodId,
    }, {
      idempotencyKey, // Stripe handles the idempotency
    });

    await db.subscriptions.create({
      id: subscription.id,
      userId: req.user.id,
      planId,
      idempotencyKey,
      status: 'active',
    });

    res.json({ subscriptionId: subscription.id, status: 'created' });
  } catch (error) {
    res.status(400).json({ error: error.message });
  }
});
Generate the idempotency key on the client (UUID) and send it with the request. If the request fails due to a network error, the client can retry with the same key without creating duplicate charges.
Step 5: Process Webhooks Safely
Webhooks are where most payment integrations break. Here’s the architecture that actually works:
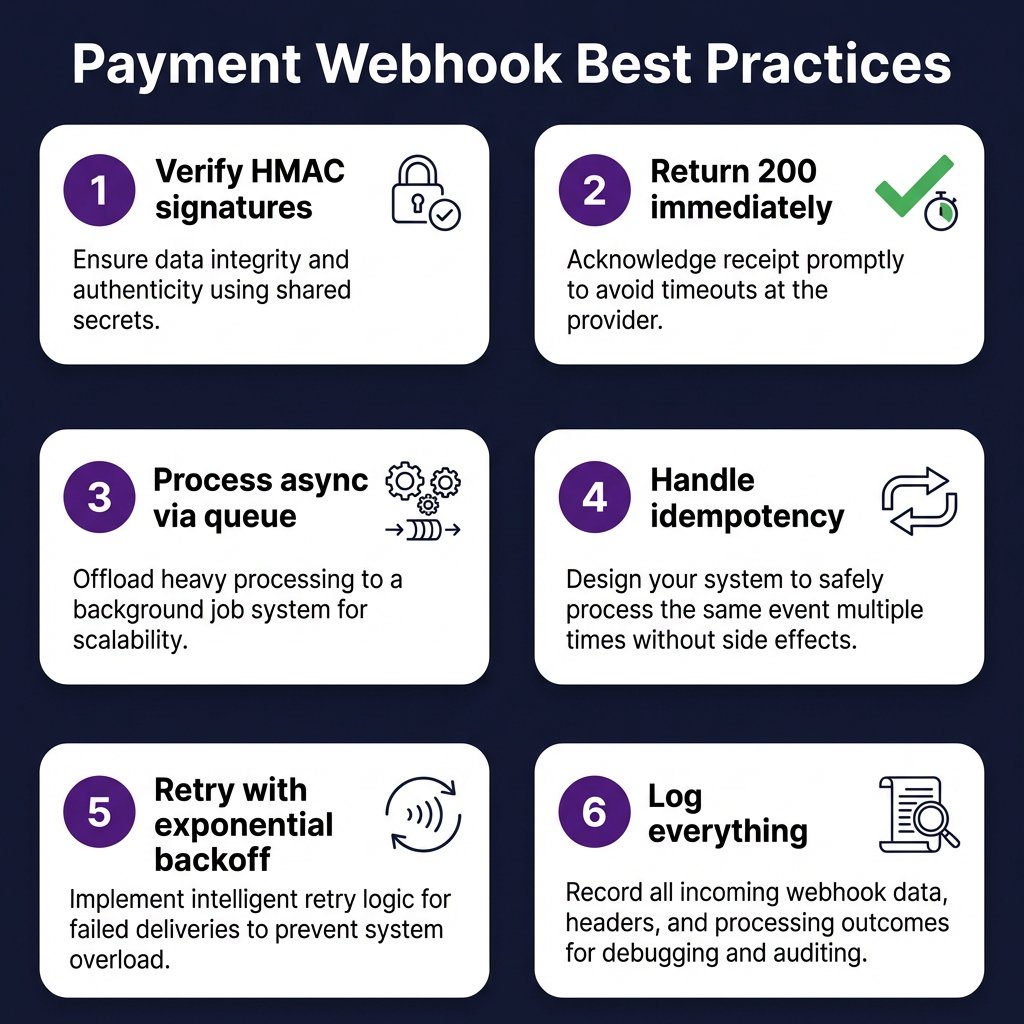
The Queue-Based Webhook Pattern
app.post('/webhooks/stripe', async (req, res) => {
  // 1. Verify signature immediately
  const sig = req.headers['stripe-signature'];
  let event;

  try {
    event = stripe.webhooks.constructEvent(req.body, sig, webhookSecret);
  } catch (err) {
    return res.status(400).send(`Webhook Error: ${err.message}`);
  }

  // 2. Acknowledge receipt immediately (within 10 seconds)
  res.json({ received: true });

  // 3. Queue for async processing
  await queue.add('process-webhook', {
    eventType: event.type,
    eventId: event.id,
    data: event.data.object,
    receivedAt: new Date().toISOString(),
  });
});

// Process in background worker
queue.process('process-webhook', async (job) => {
  const { eventType, eventId, data } = job.data;

  // 4. Check for duplicates
  const processed = await db.webhookEvents.findOne({ eventId });
  if (processed) return; // Already handled

  // 5. Process based on event type
  switch (eventType) {
    case 'invoice.payment_succeeded':
      await handlePaymentSuccess(data);
      break;
    case 'invoice.payment_failed':
      await handlePaymentFailure(data);
      break;
    // ... other events
  }

  // 6. Mark as processed
  await db.webhookEvents.create({ eventId, processedAt: new Date() });
});
This pattern solves the timeout problem, handles duplicate webhooks gracefully, and keeps your HTTP responses fast.
Step 6: Verify Webhook Signatures
Never trust a webhook just because it hit your endpoint. Always verify the signature to confirm it came from your payment provider.
// Stripe signature verification
const sig = req.headers['stripe-signature'];
const endpointSecret = process.env.STRIPE_WEBHOOK_SECRET;

try {
  const event = stripe.webhooks.constructEvent(req.body, sig, endpointSecret);
  // Process verified event
} catch (err) {
  console.log(`⚠️  Webhook signature verification failed.`);
  return res.status(400).send('Invalid signature');
}
Use constant-time comparison for signature verification to prevent timing attacks. Most payment SDKs handle this for you — don’t roll your own crypto.
Step 7: Handle Errors Gracefully
Payment APIs fail. Networks timeout. Databases go down. Your integration needs to handle all of these without losing money or customer trust.
Common Error Types
| Error Type | Example | Handling Strategy |
|---|---|---|
| Card errors | Insufficient funds, expired card | Return clear message to customer, prompt for new card |
| API errors | Rate limit, invalid parameters | Retry with exponential backoff, alert team if persistent |
| Network errors | Timeout, connection reset | Retry with idempotency key, check status before retrying |
| Webhook errors | Endpoint down, processing failed | Queue for retry, monitor failed webhook dashboard |
Implement Exponential Backoff
async function retryWithBackoff(operation, maxRetries = 3) {
  for (let i = 0; i < maxRetries; i++) {
    try {
      return await operation();
    } catch (error) {
      if (i === maxRetries - 1) throw error;

      // Exponential backoff: 1s, 2s, 4s
      const delay = Math.pow(2, i) * 1000;
      await new Promise(resolve => setTimeout(resolve, delay));
    }
  }
}
Step 8: Monitor Everything
You can’t fix what you can’t see. Set up monitoring for these key metrics:
- Payment success rate: Should be >95%. Drops indicate checkout issues.
- Webhook delivery rate: Should be >99%. Failures mean your endpoint is down.
- Average checkout time: Increases indicate friction or errors.
- Failed payment recovery: Track dunning effectiveness.
- API error rates: Alert on spikes in 4xx/5xx errors.
Use your payment provider’s dashboard, but also emit custom events to your own monitoring system. You want to detect issues before customers complain.
Step 9: Test Your Integration
Payment testing requires special handling. Here’s your testing checklist:
Use Test Cards
Every payment provider offers test card numbers. Stripe’s test cards include scenarios for success, failure, 3D Secure, and specific error codes. Never use real cards in testing.
Test Webhooks Locally
# Using Stripe CLI to forward webhooks locally
stripe listen --forward-to localhost:3000/webhooks/stripe

# Trigger test events
stripe trigger invoice.payment_succeeded
Test Edge Cases
- Network timeout during charge creation
- Duplicate webhook delivery
- Webhook signature verification failure
- Database failure during webhook processing
- Rapid subscription upgrades/downgrades
- Chargeback notification handling
Alternative: Skip the Complexity with a Merchant of Record
Honestly? If you’re a solo founder or small team, you might not need to build all of this yourself. A Merchant of Record (MoR) like Fungies handles the entire payment infrastructure for you:
- No webhook handling — events are processed automatically
- No tax compliance — VAT/GST calculated and remitted globally
- No PCI compliance — checkout is hosted and secure
- No subscription logic — billing cycles managed for you
- Simple API — one integration for payments, tax, and compliance
Fungies charges 5% + $0.50 per transaction with no monthly fees. For comparison, building and maintaining your own payment infrastructure typically costs $50K+ annually in engineering time.
FAQ: Payment API Integration
How long does payment API integration take?
A basic integration takes 1-2 weeks. A production-ready integration with proper error handling, webhooks, and testing takes 4-6 weeks. Using a Merchant of Record reduces this to 1-2 days.
Do I need to handle PCI compliance?
If you use embedded checkout (Stripe Elements) or a hosted solution, PCI compliance is handled for you. If you build a custom form that touches card data, you need PCI DSS compliance — a complex audit process that most SaaS companies should avoid.
What happens if a webhook fails?
Payment providers retry failed webhooks with exponential backoff for 3-7 days. You should also implement a reconciliation job that periodically fetches recent events from the API to catch any missed webhooks.
Should I use webhooks or polling?
Use webhooks for real-time events (payment success, subscription changes) and polling as a backup for reconciliation. Webhooks are faster and more efficient, but polling ensures you don’t miss events if your endpoint was down.
How do I handle subscription upgrades?
Use proration. When a customer upgrades, calculate the unused portion of their current plan and apply it as credit toward the new plan. Most payment APIs handle proration automatically if you configure it correctly.
Conclusion
Payment API integration is one of the highest-stakes pieces of code you’ll write. A bug here directly impacts revenue and customer trust. The patterns in this guide — idempotency, queue-based webhook processing, signature verification, and comprehensive monitoring — will keep your payments flowing smoothly.
But remember: every line of payment code you write is code you have to maintain. If you’re building a SaaS and want to focus on your product instead of payment infrastructure, consider using Fungies. We handle the webhooks, tax compliance, and global payments so you can ship faster.