How to create a grid-based map system in Unity
Maps are a staple of many types of games and there are many different types of maps. This article aims to help you create a grid-based map system for a 2D Metroidvania or Dungeon Crawler type of game. A basic knowledge of Unity and its 2D features is recommended.
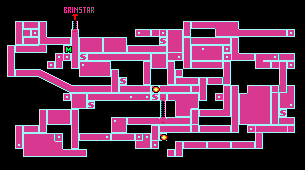
By the end, you should be able to create a map system in the style of 2D Metroid with maps that gradually get revealed by player exploration. You’ll be able to draw it right in the Unity editor using the tilemap feature and you won’t be restricted to drawing uniform boxes.
All you’ll need for art is a white square and squares for any color you may want on the map. You’ll also need the 2D Tilemap Extras package which you can find in the Package Manager under Unity Registry on newer versions of Unity. If you don’t see it, you can import it from GitHub.
Creating the Grid
You’ll need to create 3 scripts: MapController.cs, MapSection.cs, and MapIcon.cs. The MapController script will be attached to each map you make, so here’s where we’ll generate the grid. You need a reference to the grid parent object and a reference to the map section prefab. You’ll also need to define the size of each cell, but I’d recommend storing that variable somewhere consistent and easy to access, like a game manager or on a scriptable object. I used a cell size of 12, but any size should work with little to no tweaking. Now let’s generate the grid!
[ContextMenu("Create Grid")]

public void CreateGrid()

{

    //Removes any existing grid

    if (gridParent.childCount > 0)

    {

        var ngo = new GameObject();

        ngo.transform.parent = transform;

        ngo.transform.position = gridParent.position;

        ngo.layer = LayerMask.NameToLayer("Map");

//Normal Destroy doesn't work in the editor

        if (Application.isEditor && !Application.isPlaying)

            DestroyImmediate(gridParent.gameObject);

        else

            Destroy(gridParent.gameObject);

        ngo.name = "GRID PARENT";

        gridParent = ngo.transform;

    }

    //Generates a new grid

    for (int y = 0; y < height; y++)

    {

        for (int x = 0; x < width; x++)

        {

            SpawnSection(x, y);

        }

    }

}

private void SpawnSection(int x, int y)

{

    Vector3 offset = new Vector3();

    //Enable this to center the pivot point of the grid

    //offset = new Vector3(-CellSize * (width / 2), CellSize * (height / 2));

    GameObject g = Instantiate(cellObject, gridParent);

    g.name = g.name.Replace("(Clone)", "") + $" <{x}, {y}>";

    g.transform.position = new Vector3(gridParent.position.x + (x * CellSize), gridParent.position.y - (y * CellSize)) + offset;

    g.transform.localScale = new Vector3(CellSize, CellSize, 1);

    g.SetActive(true);

}
Adding the Context Menu attribute will allow us to call this function from the editor by right-clicking the script and selecting the function. You can automatically call CreateGrid on Start, but just remember that spawning so many game objects at once could cause a temporary lag spike.
Another important aspect of this system is the borders that define the map area. We’ll use Sprite Masks to reveal the map gradually, so the tilemaps that will make up the map should only be visible inside those masks. However, you may want parts of the map to be visible by default. You can make a method to handle all this for you.
/// <summary>

/// Ensures that the map borders don't appear outside of active map sections

/// </summary>

public void MaskBorders()

{

    var tilemaps = GetComponentsInChildren<UnityEngine.Tilemaps.TilemapRenderer>();

    for (int i = 0; i < tilemaps.Length; i++)

{

        if (tilemaps[i].name.Contains("Visible") || tilemaps[i].CompareTag("Visible Map"))

           tilemaps[i].maskInteraction = SpriteMaskInteraction.None;

else

           tilemaps[i].maskInteraction = SpriteMaskInteraction.VisibleInsideMask;

//When editing you may want to make the tilemap transparent, so this corrects for that

        var tilemapComp = tilemaps[i].GetComponent<UnityEngine.Tilemaps.Tilemap>();

        tilemapComp.color = new Color(tilemapComp.color.r, tilemapComp.color.g, tilemapComp.color.b, 1);

    }

}
Depending on your game’s needs, you may need a map to be viewable but not interactive. For example, the player switches to a different level, but you still want other level maps to be visible. In that case, you’ll need to track which maps belong to which scenes and disable collision on map section objects when you switch from its valid scene(s).
Setting Up a Map in the Editor
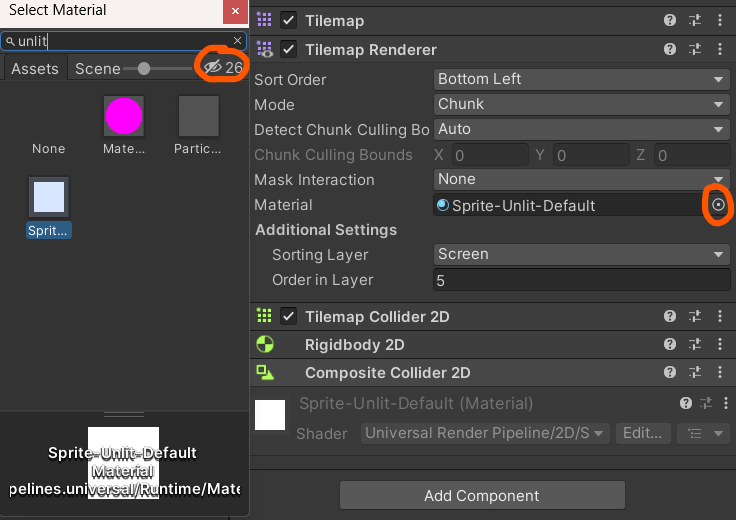
Back in the editor, create a new Layer called “Map.” In Project Settings, change the Collision Matrix so that the Map layer only interacts with itself. Ensure that the Culling Masks of your normal cameras don’t include the Map layer. Every map object should be in this layer so that they don’t interfere with gameplay. Every map object with a renderer should use the Sorting Layer closest to the screen which I’ll simply call “Screen,” and if your project uses 2D Lights, then you’ll probably want to switch the material to something that ignores lighting like “Sprite-Unlit-Default.” In the renderer, select the dot next to the material, search for “unlit,” and if it doesn’t show up, click the icon of the eye with a slash through it.
You may want to put every map in a separate map scene and load it alongside the level scene if you want to be able to look at maps from any level, or you can put it on the level scene itself. Regardless, add a tilemap Grid to the scene to start making the map. Under the tile grid object, add an object with the MapController script attached. I’ll call it “Area 1 Map.”
Create an object that will contain our map grid called “Grid Parent”, as well as a cell object for Area 1’s MapController. The cell object will need a MapSection script, a SpriteMask, and a BoxCollider2D. The Sprite Mask should have a custom range of Screen -10 to Screen 10. The Collider should have “Is Trigger” checked and an x & y size of about 0.95. Either leave this cell object disabled or make it a prefab and remove it from the scene.
You should now be able to use that Context Menu from before to generate the map grid in the editor! But now we need to display the map itself.
Drawing the Borders
Under the Area 1 Map, add a rectangular tilemap object and make sure its Sort Order is between Screen -10 to 10 so it gets affected by the Sprite Mask from before. Give it a TilemapCollider2D and check “Used By Composite” and then add a CompositeCollider2D with a “Geometry Type” of “Polygons.” A Rigidbody2D will automatically get added, so set it to static.
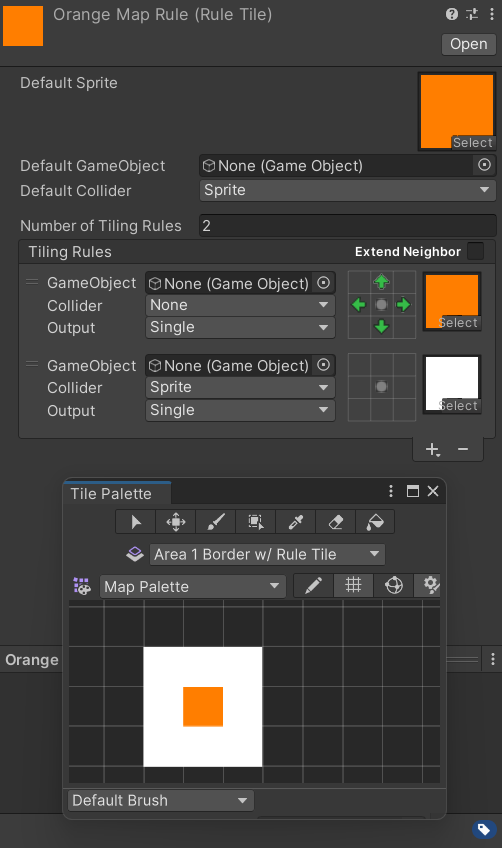
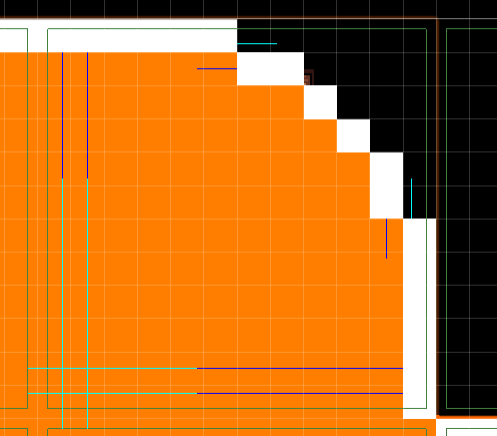
Now you need to set up a Tilemap Palette for your map tiles. While you can place them manually, using Rule Tiles will speed up the process significantly. Create a Rule Tile asset and set it up like the picture below. The green arrows mean that a neighboring tile is required in that direction. Ensure that your fill sprite (in this case the orange square) has “None” for the Collider field and if you want thicker corners on your map borders, require diagonal neighbors in addition to up, down, left, and right. Afterward, drag and drop the rule tile into the palette.
You’re now ready to start drawing, but you’ll want to see the map grid to use as a guide. Right-click the grid parent and click on “Select Children” to see the colliders. Alternatively, you could code a grid gizmo to always display by using Unity’s OnDrawGizmos method in the MapController script, but that’s beyond this tutorial.
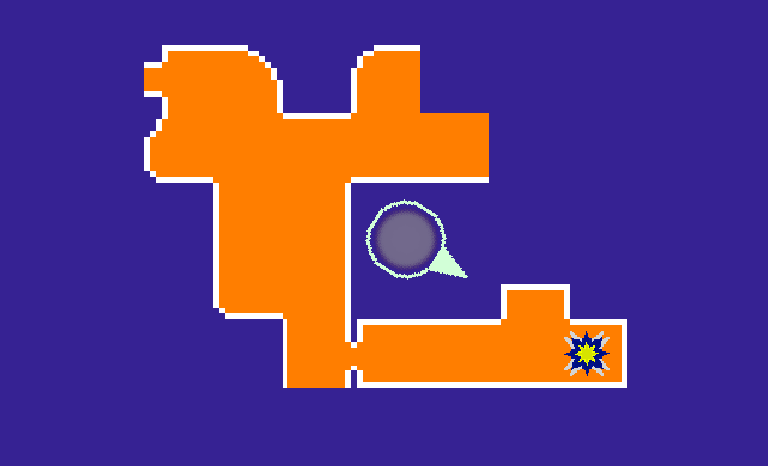
If you hit play at this point, your normal border should get hidden by the MaskBorders method from before. So let’s make a way to activate the Sprite Mask grid.
Activating Map Sections
MapSection.cs only needs a reference to its Sprite Mask and 2 methods. Unity’s built-in OnTriggerEnter2D needs to detect collision with the player’s map icon (maybe using a tag), and then call a custom method that we’ll name Activate.
public void Activate()

{

    if (borderMask == null)

        borderMask = GetComponentInChildren<SpriteMask>();

    //Displays the surrounding border

borderMask.enabled = true;

}

This is enough to show the map section, but you might want to activate adjacent map sections at the same time. For that, you’ll need a bool to track if a section was directly activated or not, which I’ll call “touchedByPlayer.” You’ll also want 2 floats for padding values. I recommend setting these to 1.5f and 0.75f.

public void Activate(bool activateAdjacent)

{

    if (touchedByPlayer || disableCollisions)

        return;

    touchedByPlayer = activateAdjacent;

    if (borderMask == null)

        borderMask = GetComponentInChildren<SpriteMask>();

    //Displays the surrounding border

borderMask.enabled = true;

    if (!activateAdjacent)

        return;

    //!Send rays to activate the adjacent sections above, below, left and right

    Vector3 rayOrigin;

    float cellSize = transform.localScale.x;

    Color dRayColor1 = Color.cyan;

    Color dRayColor2 = Color.blue;

    //! Up rays

    CheckAdjacent(Vector2.up, Vector2.left, rayNormalPadding);

    CheckAdjacent(Vector2.up, Vector2.right, rayNormalPadding);

    CheckAdjacent(Vector2.up, Vector2.left, raySecondaryPadding);

    CheckAdjacent(Vector2.up, Vector2.right, raySecondaryPadding);

    //! Down rays

    CheckAdjacent(Vector2.down, Vector2.left, rayNormalPadding);

    CheckAdjacent(Vector2.down, Vector2.right, rayNormalPadding);

    CheckAdjacent(Vector2.down, Vector2.left, raySecondaryPadding);

    CheckAdjacent(Vector2.down, Vector2.right, raySecondaryPadding);

    //! Left rays

    CheckAdjacent(Vector2.left, Vector2.up, rayNormalPadding);

    CheckAdjacent(Vector2.left, Vector2.down, rayNormalPadding);

    CheckAdjacent(Vector2.left, Vector2.up, raySecondaryPadding);

    CheckAdjacent(Vector2.left, Vector2.down, raySecondaryPadding);

    //! Right rays

    CheckAdjacent(Vector2.right, Vector2.up, rayNormalPadding);

    CheckAdjacent(Vector2.right, Vector2.down, rayNormalPadding);

    CheckAdjacent(Vector2.right, Vector2.up, raySecondaryPadding);

    CheckAdjacent(Vector2.right, Vector2.down, raySecondaryPadding);

    void CheckAdjacent(Vector2 _dir, Vector2 _offsetDir, float padding = 1.5f)

    {

        float paddedEdgeDist = (cellSize / 2 - padding);

        rayOrigin = (Vector2)transform.position - (0.1f * cellSize * _dir) + (_offsetDir * paddedEdgeDist);

        RaycastHit2D[] rayHits = Physics2D.RaycastAll(rayOrigin, _dir, cellSize, LayerMask.GetMask("Map"));

        MapSection adjacentSection = null;

        RaycastHit2D rayHit = new RaycastHit2D();

        foreach (var r in rayHits)

        {

            //Ignore yourself

            if (r.collider.gameObject == gameObject)

                continue;

            //Only count border tiles or other MapSections

            if (r.collider.GetComponent<UnityEngine.Tilemaps.TilemapCollider2D>() || r.collider.TryGetComponent(out adjacentSection))

            {

                rayHit = r;

                break;

            }

        }

        //Only continue if the ray hit something

        if (rayHit.collider == null)

            return;

        //debug line

        Color c = (_dir.x < 0 || _dir.y < 0) ? dRayColor1 : dRayColor2;

        Debug.DrawLine(rayOrigin, rayHit.point, c, 5f);

        //The ray hit a MapSection!

        if (adjacentSection)

            adjacentSection.Activate(false);

    }

}
You may be wondering why we used so many raycasts. That’s because we don’t want sections being activated behind the map borders even if they’re a weird shape. The player shouldn’t be able to fill in a room that they’re not in. Note that some border shapes could still cause issues with my settings, so feel free to experiment. If you create a map icon object with a collider and a kinematic rigidbody you should see the map get revealed as you move it around in the scene view.
But of course, we still need the icon to move with the player and we need a way to see the map in-game.
Setting up the Player’s Map Icon
As I mentioned, you first need to set up the map icon object in the editor, which we’ll name “Map Icon.” It should have the MapIcon script, a small 2D collider with “Is Trigger” checked, and a Rigidbody2D set to kinematic because an active rigidbody is required for Unity to call the OnTriggerEnter2D method that we defined in MapSection.cs.
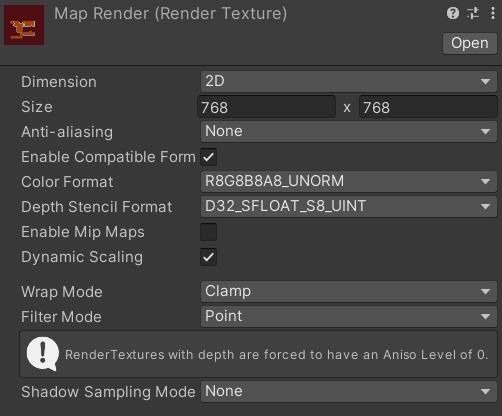
Add a child object to Map Icon to display your icon graphic (GFX), and then add a camera as a child to Map Icon. This camera, called “Map Cam,” needs a Culling Mask set to the Map layer only, needs to be Orthographic, and have a Near Clipping Plane of 0. This camera will render to a texture instead of the screen, so create a Render Texture asset (the specific settings are up to you) and assign it to the Map Cam’s Target Texture.
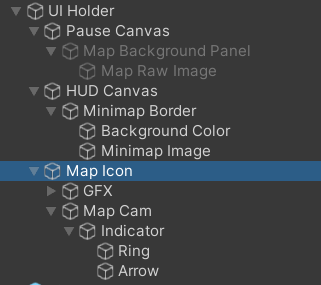
To display the Render Texture from the Map Cam on the screen, we need the Raw Image UI element. For a mini-map, add a Raw Image to a canvas that’ll show during gameplay and simply drag the Render Texture from earlier into the “Texture” field. The width and height of the Raw Image should fit the aspect ratio of the Render Texture to avoid warping.
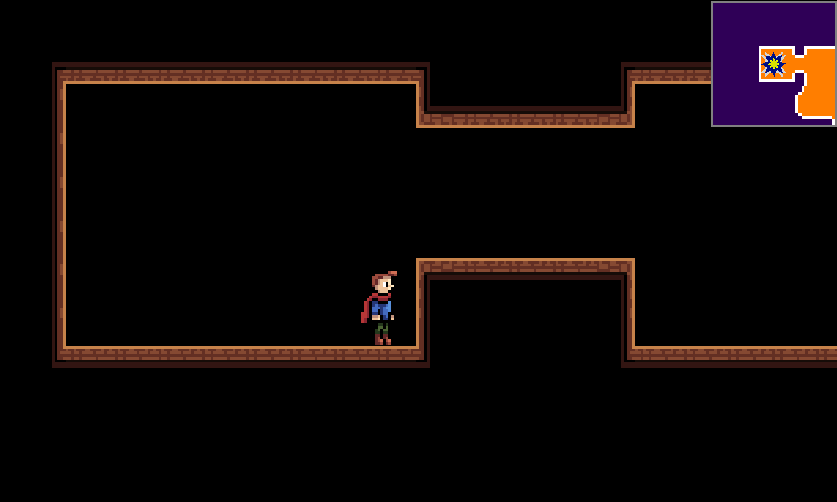
The process for the full map is similar, but keeping the aspect ratio is a bit trickier. Anchor the Raw Image to the center and then scale the width and height until it covers the whole canvas while keeping the aspect ratio. Now change the anchor to “stretch.” This will likely leave parts of the map cut off, but that’s fine since we’ll be able to pan the map camera around. This map should stay disabled until the player opens it through whichever process your game uses.
Moving the Player’s Map Icon
MapIcon.cs is the last piece of the system. There are a few required fields:
bool isFullMapOpened;

[SerializeField] Transform mapCursor;

[SerializeField] Transform arrowToIcon;

[SerializeField] Camera mapCam;

[SerializeField] float camSpeed = 75;

[SerializeField] float fullMapCamSize = 80;

[SerializeField] float miniMapCamSize = 20;
You can just set the icon’s position to your player’s position, or you can make the icon snap to the grid and maybe add an offset depending on your game’s needs. This can also be used for map icons attached to points of interest like a save point or a key item.
Vector3 roundedPlayerPos = new Vector3(Mathf.Round(player.position.x / cellSize) * cellSize, Mathf.Round(player.position.y / cellSize) * cellSize);

transform.position = roundedPlayerPos + (Vector3)iconOffset;
In the Update method, we’ll handle the logic for panning the Map Cam when the map is full screened as well as setting values for the mini-map.
if (isFullMapOpened)//Full map mode

{

    mapCam.orthographicSize = fullMapCamSize;

    if (!mapCursor.gameObject.activeSelf)

        mapCursor.gameObject.SetActive(true);

    //Make the arrow point in the direction of the player

    if (Vector2.Distance(mapCam.transform.position, transform.position) > 12)

    {

        if (!arrowToIcon.gameObject.activeSelf)

            arrowToIcon.gameObject.SetActive(true);

        //The cursor must be on the same Z plane as the icon for this to work

        mapCursor.LookAt(transform.position);

        mapCursor.Rotate(0, -90, -90);

    }

    else//don't display the arrow if the cursor is too close to the icon

    {

        if (arrowToIcon.gameObject.activeSelf)

            arrowToIcon.gameObject.SetActive(false);

        mapCursor.eulerAngles = new Vector3(0, 0, 0);

    }

    //! Camera Panning Logic

    var mov = new Vector3(YourInput.HorizontalRaw(), YourInput.VerticalRaw(), 0);

var curSpeed = camSpeed;

mapCam.transform.position += curSpeed * Time.unscaledDeltaTime * mov;

}

else //mini-map mode

{

    mapCam.orthographicSize = miniMapCamSize;

    mapCam.transform.localPosition = Vector3.zero;

    mapCursor.eulerAngles = Vector3.zero;

    if (mapCursor.gameObject.activeSelf)

        mapCursor.gameObject.SetActive(false);

}
And there you have it, a fully functional map system with a mini-map!
Extra
Technically the MapSection.cs script is unnecessary since it’s just used to detect collisions. Instead, you could use the player’s position to determine which cell they’re in and activate it that way. However, using colliders makes it easier to link multiple grids together, maybe to expand an area while keeping your players’ saved map data intact or to make unevenly shaped map grids. It also makes it easier to manipulate parts of the map during gameplay if needed.
Also, you can stack tilemaps on top of one another to add details or to display parts of the map by default. Just make sure to remove the colliders from any tilemaps that are just for detail. If you want a visible map outline, create another rule tile but leave the inner sprite blank. Then copy the normal border tilemap and use the tile bucket tool to fill the copy with the outline rule tile.
Conclusion
Designing a map system in Unity can be a daunting task, but with the right tools and knowledge, it can be done efficiently. In this article, we have explored how to create a grid-based map system that your players can gradually uncover. Once you have the system set up, you only need to do 2 things for each map:
- Attach the MapController script to the map game object so that you can generate the grid. Ensure that this is on a “Map” layer that doesn’t interfere with gameplay.
- Draw the map using the grid as a guide. The Rule Tile feature makes this quick and easy, but I only covered the basics, so you might be able to do a lot more with it.
In conclusion, this system provides an easy way to create functional maps for your game without leaving the Unity editor. With some practice and experimentation, you can customize this system to fit your game’s needs and create unique maps that enhance gameplay.