In this part, we’ll focus on movements
The Joystick
Input values for player’s character direction comes from so called virtual joystick. In it’s core it can be developed from two nodes: Sprite 2D as boundary area and TouchScreenButton as primary button. However, we did placed two additional Sprite2D as frames in order to give our joystick bit a better look and also be able to extend it later on – maybe make so that frames changes when button is pressed or drag around.
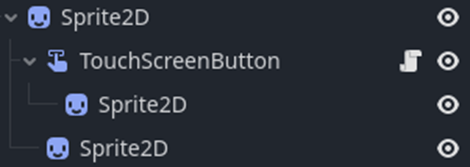
As you can see on the image, joystick functionality comes from TouchScreenButton node where it’s script is attached, not the parent node Sprite2D.
Let’s take a look to it’s script.
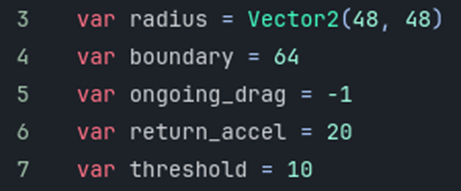
In the first part of “joystick.gd” we are defined few variables.
“radius” – it’s type of Vector2D which is size of the joystick in 2D world, making sure that base button stays in the center as value Vector2(0.0, 0.0).
“boundary” – represents limit towards we can pull around middle base button.
“ongoing_drag” – just an integer value, if there isn’t input on joystick it will be set to -1, making sure to provide information to the script that joystick in not currently being used so it can return place base button in the middle.
“return_accel” – it’s a speed used to return base button to the middle of the joystick if there isn’t input from the player.
“threshold” – makes sure that joystick will provide output only when middle button is dragged above it, avoiding use of joystick by fast, maybe miss-touched press.
In order to understand better how all these values works and influence the joystick state, it’s best if you play with them a little bit, place different values and see what impact they made to the current state of the joystick. Maybe even change some things, for example: Integer “ongoing_drag” can be replace with simple bool, etc.
The rest of the script are code lines, math that is used to make sure above variables works as they are explained.
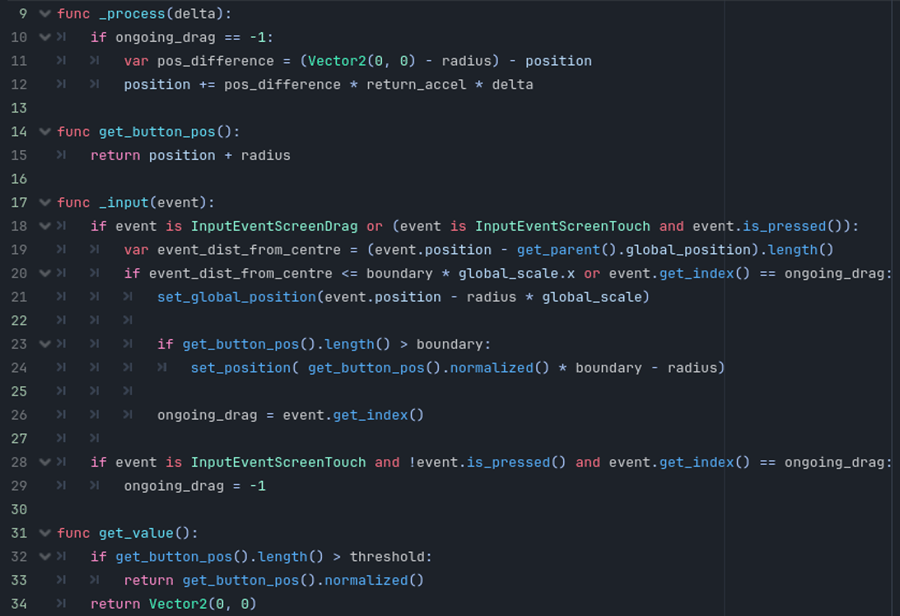
See how function “get_values” returns Vector2?
That’s the whole point of the joystick, at least this one – to get these values from the player’s input so we can use that and calculate towards what point in the world player’s character should be moving and also triggers “move” state or remove it, if values are Vector2(0.0, 0.0), if there isn’t input in other words.
Note: This kind of joystick can be extended, maybe even as class, in order to provide you output values for other in-game buttons, like targeting attack or areas of effects, spell casting, etc.
Being Class
Player’s character, common enemies, boss, etc., all shares same attributes and functions, with few exception here and there. So it’s important to make a class, that we will call “being”, which will be used as extension of all beings in the game.

In the beginning of the script we are starting by defining all variables we need. We mentioned some exception when it comes to the parts of this class – for example: Our common enemy Slime, which we are going to create later on, will not use variables “hero_class”. However, we are not going limit it only to the player’s character by placing it in the unique class used only by playable character, since later on we might want to place AI characters such as warrior, mage, etc., that are going to need this property.
Note: See how we aren’t placing any default text/value for any of variables! This will crash the game during execution from the engine, reminding us that some being are missing inputs for it’s variable.
The second part of variables we are going to explain little bit, since naming here might not be straight forward self explained.
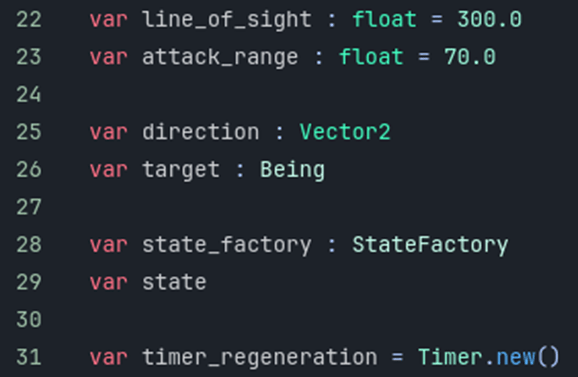
“line_of_sight” – represents area in 2D space, when player enters it, enemy will notice that and transit to it’s combat state.
“attack_range” – it’s also area in 2D space, but it should not be confused with previous variable, since this one is distance from which being can attack – it’s value should always be lesser than “line_of_sight” since otherwise “line_of_sight” will be pointless.
“direction” – is vector point towards being is focused. In it’s wandering state for example, being would go to this point before deciding to do something else.
“target” – is node on which being is focused, it can be only one at the time. There might be better examples of naming this one, since “target” not necessary needs to be node that’s being attacked. For example, being could be self-targeted, in order to cast heal or some kind of buff.
“state_factory” and “state” – are main property for the “state_machine” system. More about that will be explained in next part!
“timer_regeneration” – is Godot’s node Timer, created separately for each being when instantiated making sure it’s unique, as shown on the image below. It’s simple countdown of 1 second that defines regeneration of health and mana per second.
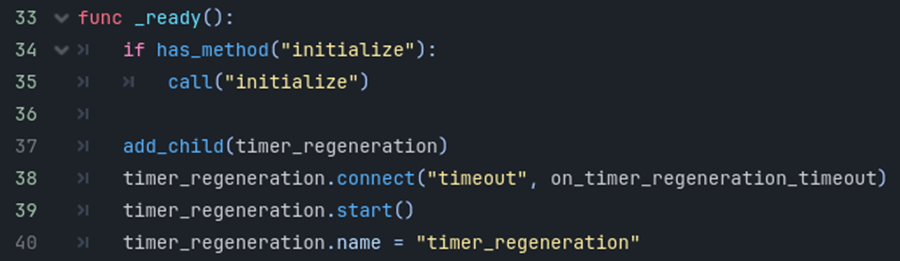
Method “initialize” is call for the unique function of the same name for each being where unique properies could be placed on. For example, instantiation of State Machine, adding preview of being to the minimap or simply making being to be part of the group by calling “add_to_group(“group_name”).
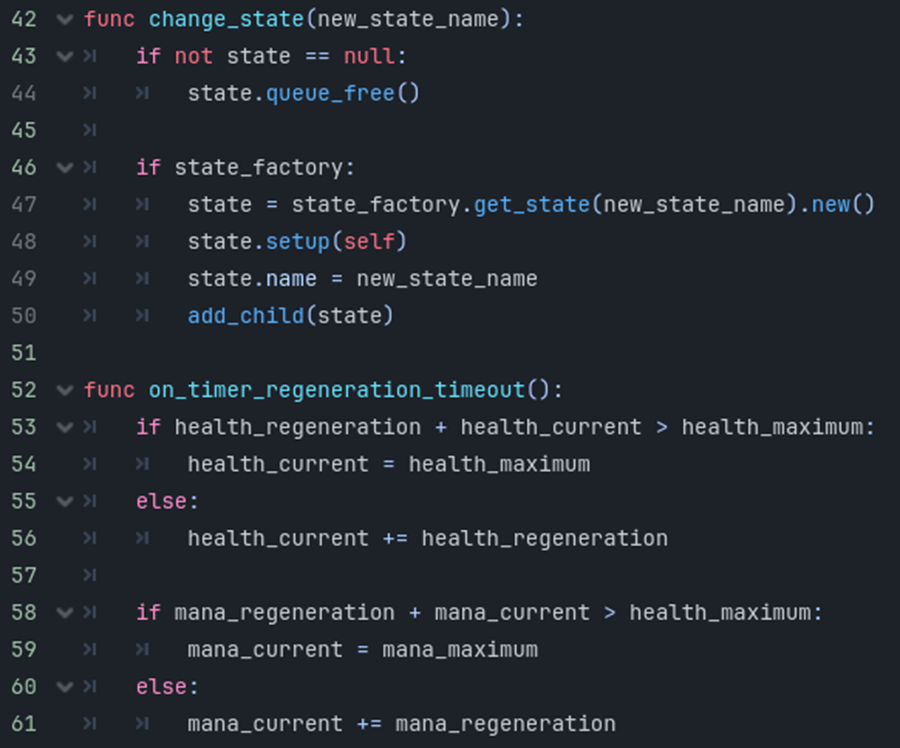
Function “change_state” as well as “state_factory” and “state” will be explained in-depth in the next part.
And last function shared by all being is signal to which is connected “timer_regeneration”. It checks health and mana regeneration rate and then add or not points to them.
State Machine System
In simple games, where a playable character have few mechanics, dealing with each state can be quite easy and manageable within single script. However, our player’s character, as well as common enemies and boss, are hosts of many states. Common ones, like idle, walk, as well as complex states, where being is receiving and providing several information in order to work as designed.
Before we start to create state classes itself, let’s go and setup base classes required by this system in order to work.
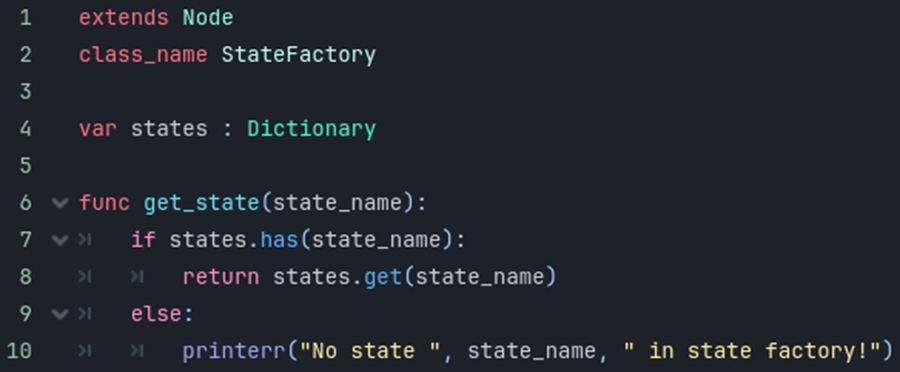
First class will be so called “StateFactory”, used as extension for each being and it’s states.
In dictionary “states” states are placed as Strings and linked to it’s state class. Then we can use these strings in order to call for certain class via function “change_state” from the being base class – “being.gd”.
Function “get_state” is used to provide state from the dictionary once when method is called.
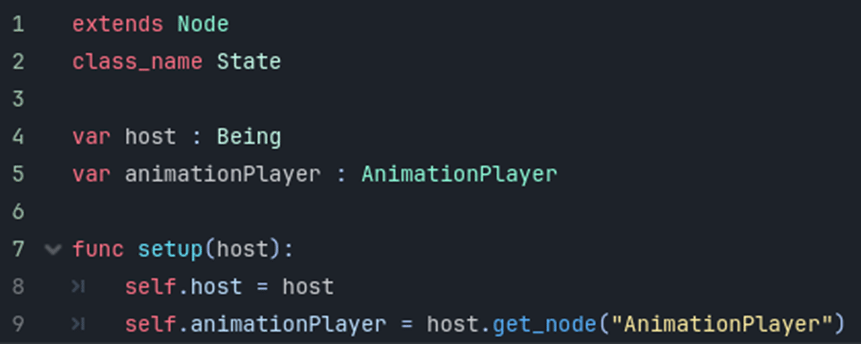
Class “State” from the image above is extension to all other states. We are using two variables : Host and AnimationPlayer. While “host” is required since state can’t exists on it’s own, “animationPlayer” is not. However, every being have AnimationPlayer node as child so this is good example how we can make shortcut to it and make it easy usable from every state.
Note: This “StateMachine” system is designed so that only one state can exist at the time for each being. Sometimes, game object might need more than one state to coexist at the time. For example, you might want to make so that player can walk and attack at the same time – meaning that arms would need to work under one, while body works under another state.
Player’s Character States
Player’s Character Stand State
Class “standStateCharacter” is starting point for the player’s character.
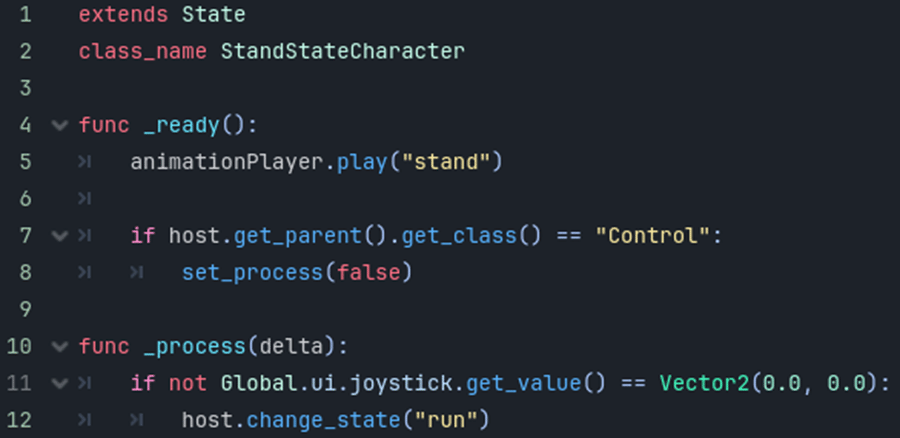
Under “_ready” function we call for “stand” animation to be player via AnimationPlayer node of player’s character – we can use it’s property variable defined as “animationPlayer” in the “state.gd”.
Second thing we do inside “_ready” function is making sure that function “_process” is set to false if player is in the character selection screen/main menu – preventing the game to crash since there isn’t instantiated virtual joystick so values required within “run” state can’t be provided.
Note: As you probably were able to guess by now, this is another example of fast prototyping. There are better way to deal with this “design” – one would be to make unique character model only to be used as preview in character selection screen/main menu. It could be built of only used nodes for preview, Sprites2D adn AniamtionPlayer, would not have to contain all non-used nodes, like Areas2D for line of sight, attack range, etc., since there isn’t purpose for them outside of gameplay world node.
Speaking of gameplay world, if player’s character is there and it’s current state is Stand State – moving middle button of our virtual joystick would output different values than Vector2(0.0, 0.0), making player to change it’s state to Run.
Player’s Character Run State
On the next image you can see how Run State for the player’s character work. Similar to the previous Stand State, under “_ready” function we call for the run animation.
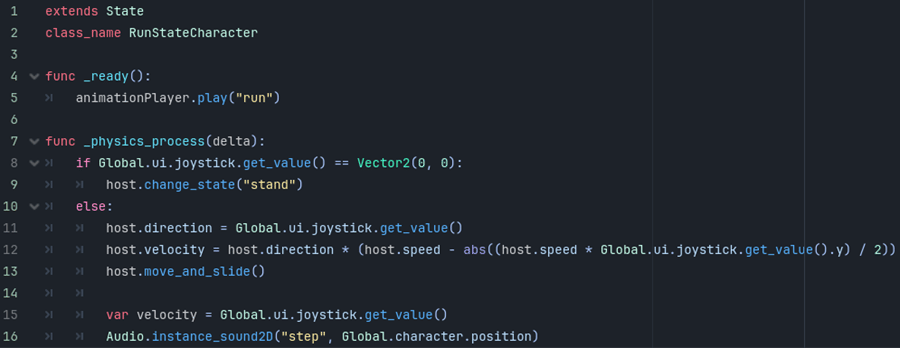
Note: There are few exceptions when it comes to the calling of animations in the states. Animation is not necessary called within “_ready” function and usually it’s name does fit the name of the state but that’s not always the case. For example, animations Run can be shared among Run and Chase state, since in both cases being will be running.
Next, under “_physics_process” we can see that once when values of virtual joystick are Vector2(0.0, 0.0) or in other word, there isn’t input on joystick, player’s character will transit to it’s Stand state. Otherwise, state will make sure that player’s character moves to the direction constantly asking joystick for it’s values output.
Player’s Character Attack State
Attack state, at least for the player’s character, is good example of making the state to play animations different than it’s name. In this game there are two weapon types: MainHand and OffHand. Meaning that player’s character can wear one or two weapons at the time. Depending on this, different attack animation will play during attack state.
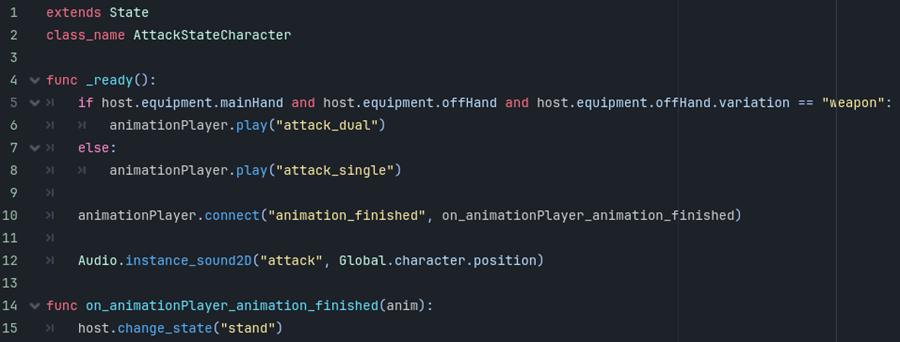
So, under “_ready” function we will first check if character is wearing one or two weapons and then play appropriate animation.
After that, we will need to make sure that character automatically changes the state when attack is done, otherwise, character would stuck together with it’s finished animation and waited for use to use joystick so it can transti to other animation. In order to do this we will connect played attack animation to the signal “animation_finished” which will lead character to it’s Stand state once when player attack animation is done.
Note: As you see, each animation have ways to transit to other. Some requires inputs while some are automated to do it at some point.
Player’s Character Death State
When player’s character enters it’s Death state, besides playing it’s animation we need to make sure that it’s not-noticeable to the enemy units. So they can go to their Stand states instead of continuously attacking targeted player’s character. We are doing this by making sure that CollisionShape2D is set to disabled.
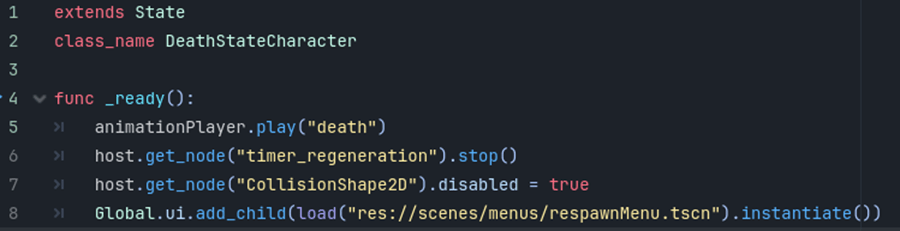
Also, regeneration have no purpose during Death state so we need to stop regeneration timer in order to prevent that – this can be done by disconnecting the Regeneration Timer’s signal “on_regenration_timer_finished”, in this case you need to make sure that same signal is connected again when character is respawned.
Death state will also interact with current Global.ui, and that would be gameplay user interface. Providing way in shape of button for player to respawn his character.
Clash State
There are three active abilities which player’s character can use, and they are: Clash, Slam and Roar. Each ability requires unique state so let’s start with the Clash state class.
Clash is skill which makes player to move fast towards it’s current direction. If collided with an object, player will automatically transit to it’s Stand state and, in case that object is enemy being, he will also deal damage to it.
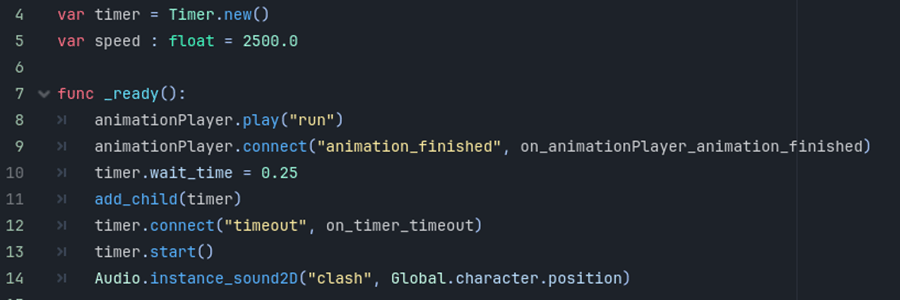
Timer here represents maximum duration of the state, preventing character to move forward endlessly before an collision happens. So, timer is connected to the signal “on_timer_timeout”, it’s property “wait_time” is set to 0.25 seconds – after what state will finish. For this you can also create unique Clash animation and use it’s duration as time for state duration – we are not doing that, as you can see we are simply using already established Run animation.
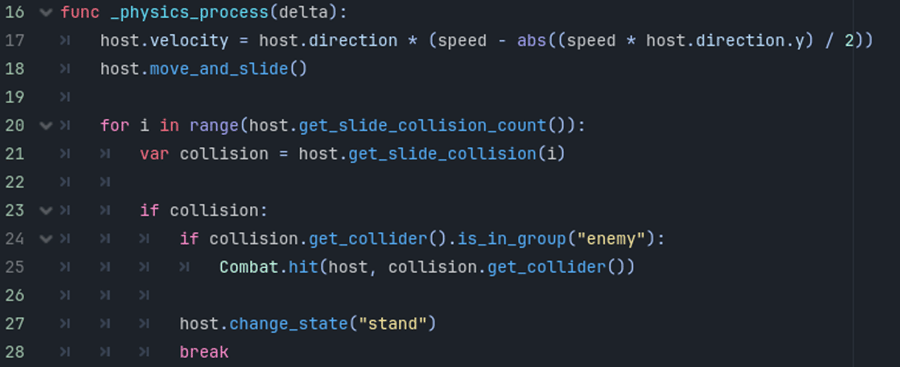
During loop of the “_physics_process” function we are including variable speed defined in the class script to increase move speed. This as you can see on the image above happens in the calculations of host’s velocity before it’s used by Godot’s built in function for class CharacterBody2D “move_and_slide”.
Below it, there is loop which checks for collision so it can force host to change the state to the Stand – it also checks if collider is in group “enemy” so it can call hit function from the “combat.gd”.
Slam State
Second player’s character ability is Slam and it’s script looks like shown on the next image.
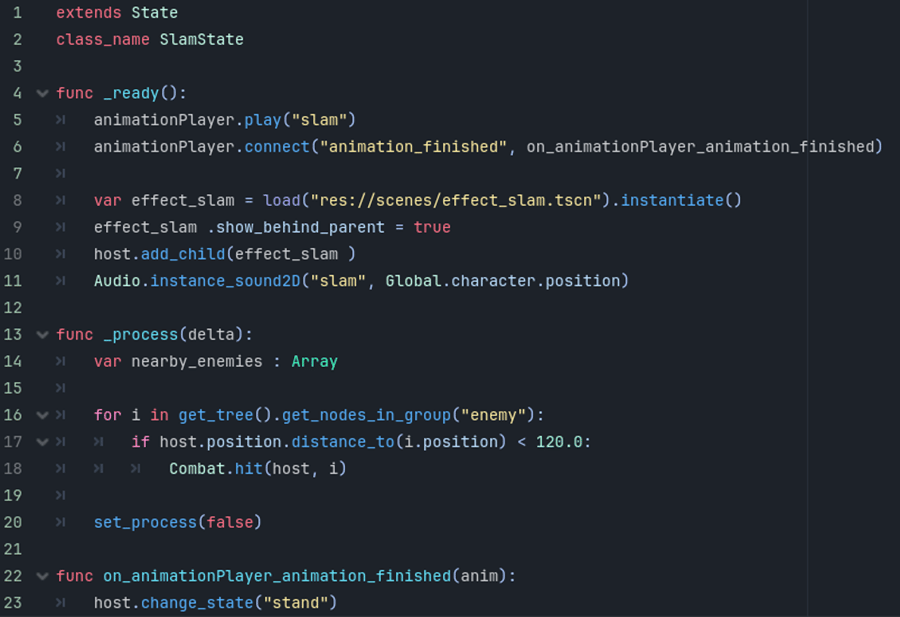
As you can tell by looking at code line five, Slam do have unique animation. Some games, like ours, will play aniamtion just to show the action and allow player to stop it at any time. However, some developers would use this animation as trigger for slam effect itself at the end of it or at certain frame – there could be few design path developers would need to be aware of since locking character to animation can lead to bad user experience.
After instantiation of Slam particles effect we calculate distances of all enemy bodies in the world in order to check if they are nearby, so that they can be damaged.
Note: Instead of looping through all bodes from the group Enemy, in calculations we could use just those that are on the screen. Or even better, make an Area2D node as representation of Slam – and use it’s function “get_overlapping_bodies” to get all bodies in it’s range.
Roar State
Last state for player’s character is Roar and while still active skill, it acts as buff and not damage dealer.
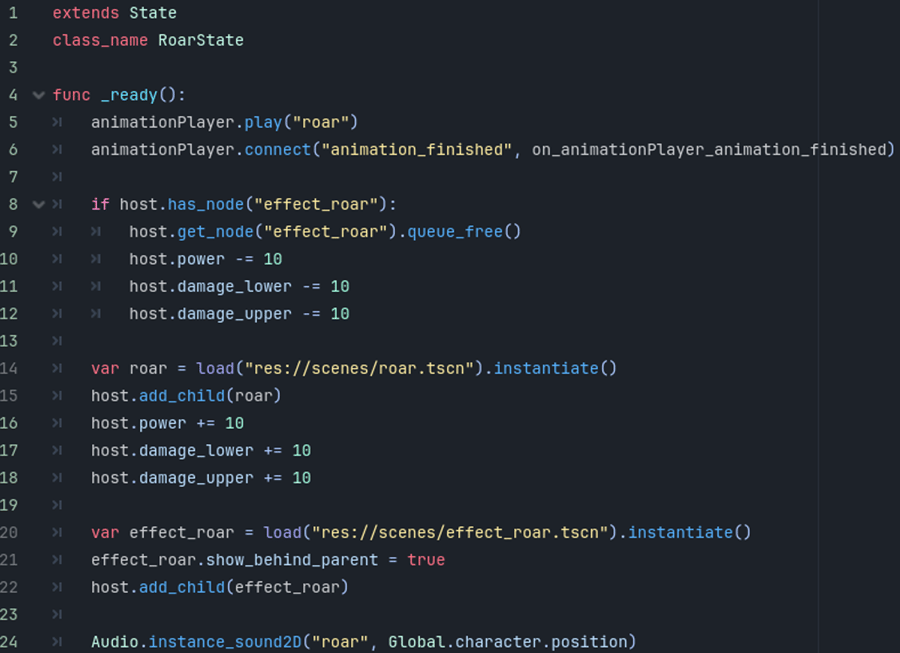
Similar to the Slam state, Roar also have unique animation and also it’s not lock to it – meaning that player can move character around while triggering this state.
After calling for animation play and connecting signal to it, the state will check if there is already Roar casted on the character. If “true”, current Roar effect will be removed, decreasing attributes provided to the host, before new Roar will take place.
On addition to it, script will instance particles effect as visual output and instance proper sound via global Audio.
Enemies AI States
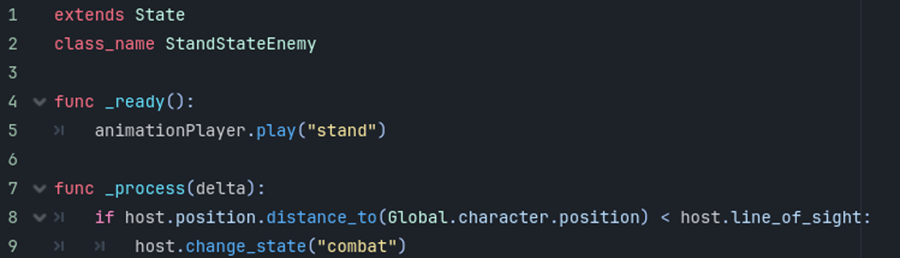
Stand AI State
Stand state for enemies in this game is simple.
Upon instantiation, enemy unit will stand still until player’s character enters it’s line of sight area. Once when that happens, enemy will transit to state “combat”.
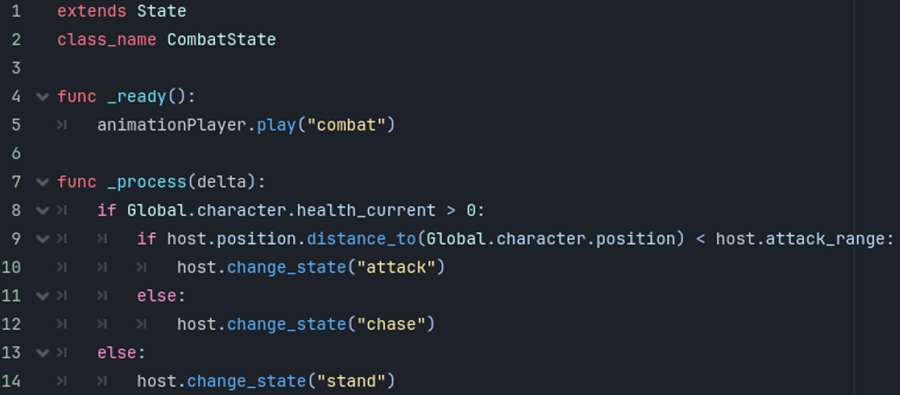
Combat AI State Enemy
There are few options, which depends on situations, for being when it’s under it’s Combat state.
There are few options,which depends on situations, for being when it’s under it’s Combat state.
Within it’s “_process” function, for each frame state will check if it’s target ‘s health is above zero. If it’s not, state will make transition to beings Stand state.
While it’s target is alive, two things can happen.
First, if target is in host’s attack range, state will be changed to Attack Sate.
And second options, if target is outside of the host’s attack range – host will go into Chase State.
Attack AI State
Hit function from global “combat.gd” is called via animation track editor. This allows us to create Attack state for enemies with just few line of codes.

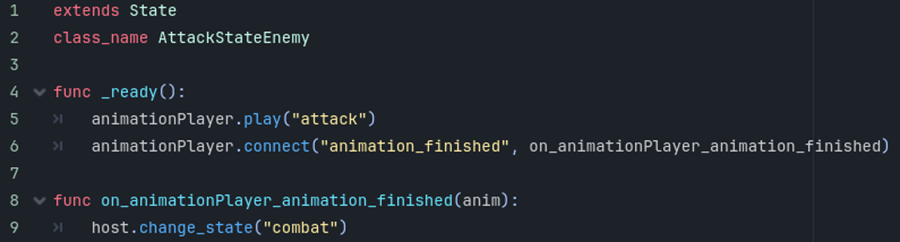
As you can see, besides animation call and it’s “animation_finished” as well as it’s function there is nothing else.
Note: Placing method call within animation track might come with a lot of limitation. However, it’s fast way to make something works without coding. While it is limited, it’s also flexible to some extensions – for example: You can make attack animation speed up or slow down by applying variable “speed” from “being.gd” to make some enemies faster when attacking than others.
Chase AI State
As it’s name says, chase state is all about chasing. During this event, host’s will constantly be looking for it’s target’s coordinates and moving itself towards it.
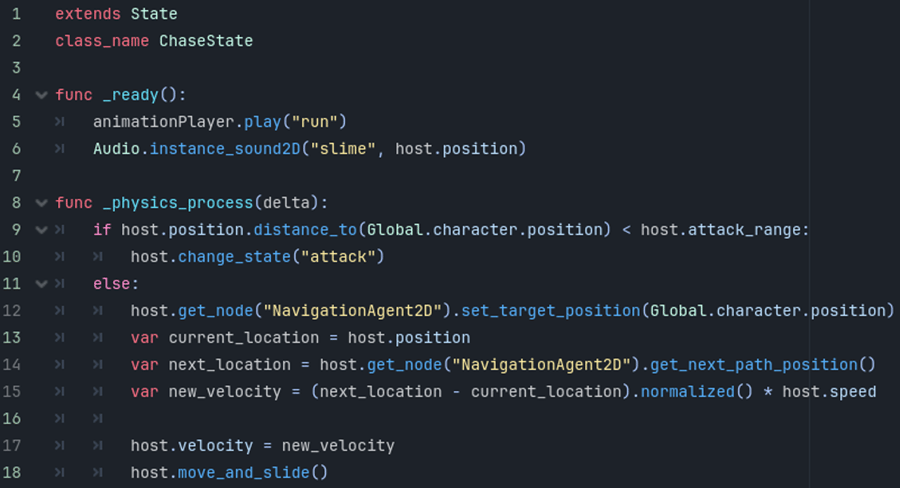
For animations we will be playing Run animations since chasing is in it’s core running.
In function “_physics_process” each frame will trigger if statement to check if host’s target is in it’s attack range. In that case, state Attack will be instantiated.
But, when host’s target is far away but still within line of sight – Godot’s awesome feature NavigationAgent2D will be used to make pathfinding to the target.
This happens by using function of NavigationAgent2D – “get_next_path_position” which will be host’s new targeting point. We apply this to the host’s velocity and just make a call for “move_and_slide” function.
Death AI State
Death state for enemies is similar to the player’s character death state, but it does come with few differences.
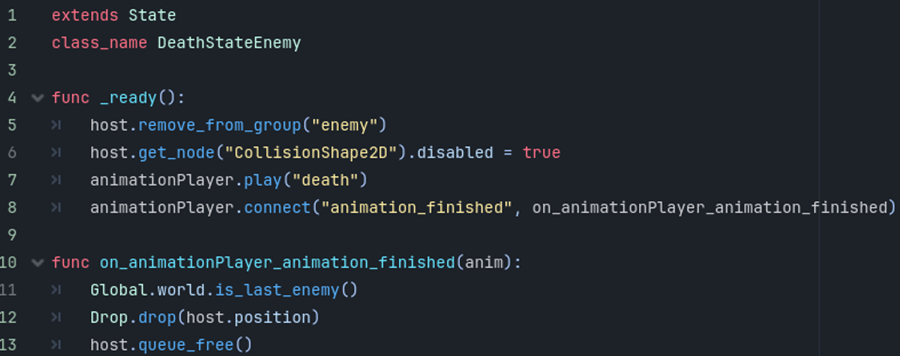
Addition to setting host’s CollisionShape2D node to disabled and playing Death animation we also needs to remove host from the group “enemy”, preventing player’s character to make it his target, etc.
When animation Death triggers the signal “aniation_finished” world function “is_last_enemy()” will check if there is no more enemies in the world – it “true” the boss of the game will be spawned at the random point in the world.
Then, before removal of it’s host from the game, state will pass host’s position to the function “drop” from global “Drop”, making sure that loot, if there is some, will be instantiated at the right position.
Combat AI State Boss
Combat state of the boss vary from combat state of common enemies. Reason for this is that boss have additional two states, and these are Stump and Splash. In order to transit to any of them, we need to make some changes to the common combat enemy state, instead of that we just make unique one, especially for boss.
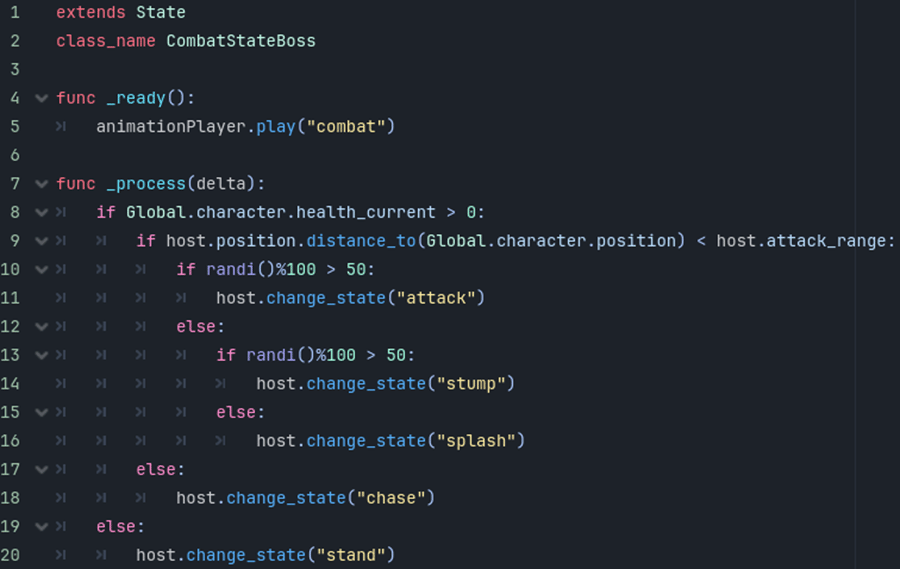
Compared to common enemy Combat state, when host’s target is in attack range, not only default attack can be triggered but also state Stump and Splash.
Stump State
This is one of two special skills of the boss. So naturally it should be more powerful than ordinary attack. This is why we multiply host’s variables “damage_lower” and “damage_upper” with two at the very initialization of the state.
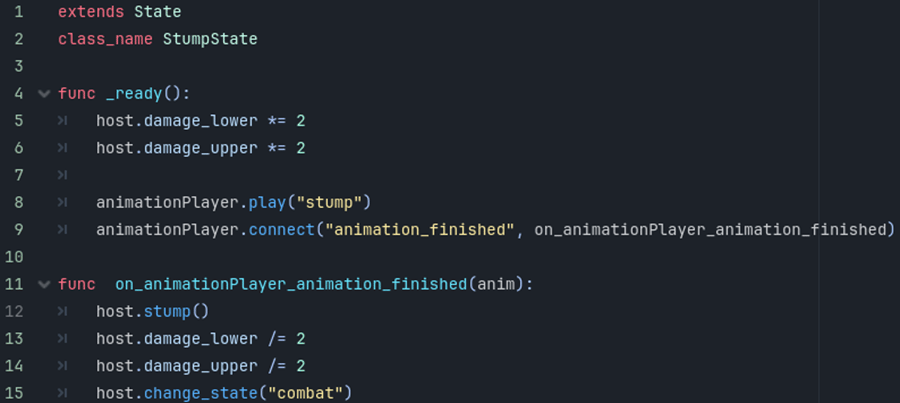
It’s important to set damage of the boss back to it’s normal state before transition to the other state, otherwise boss will kept multiplied damage and be able to deal heavy damage during it’s normal attack. So, in order to avoid this scenario we just need to divide damage variables with the same values used when multiplying.
Method “stump” called at line twelve will do following.
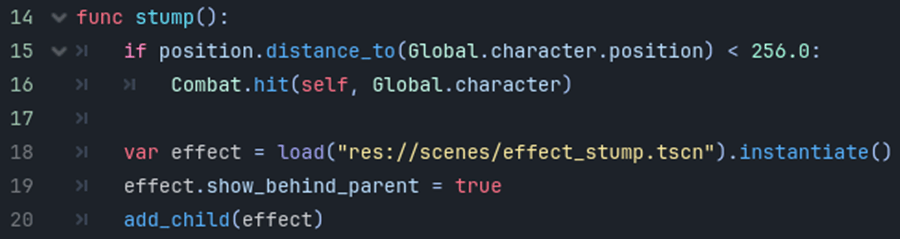
Event is similar to the player’s character Slam skill, with instantiation of different particles it will also check if player’s character is in range of the skill, and if “true” it will deal damage to it.
Note: There are few better way to do this since boss might be stopped from finishing it’s animation during Stump state – meaning that signal “animation_finished” will not be sent, so the function “on_animationPlayer_animation_finished” would never happen, making so that multiplied damage stays. One way to make sure that damage is always returned to it’s default values is to connect state to the signal “tree_exited” and divide damage back to normal under function “on_tree_exited.
Splash State
Second unique skill to the boss is Splash. Let’s take a loot at it’s script.
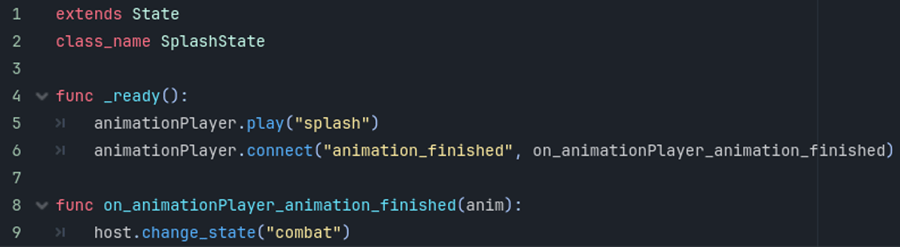
Script “splash.gd”
Similar to the enemy Attack animation the animation Splash also calls for “splash” method within it’s track.

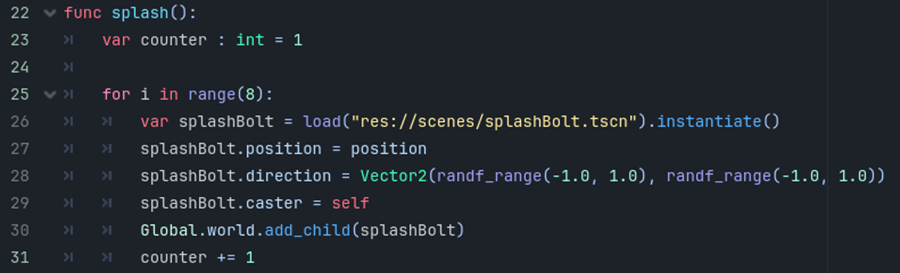
Once called, function splash will be instancing scene “spashBolt.tscn” in range of eight at the host’s position.
Bolt itself is node Area2D with CollisionShape2D and GPUParticles2D as children, it’s script is shown on the image below.
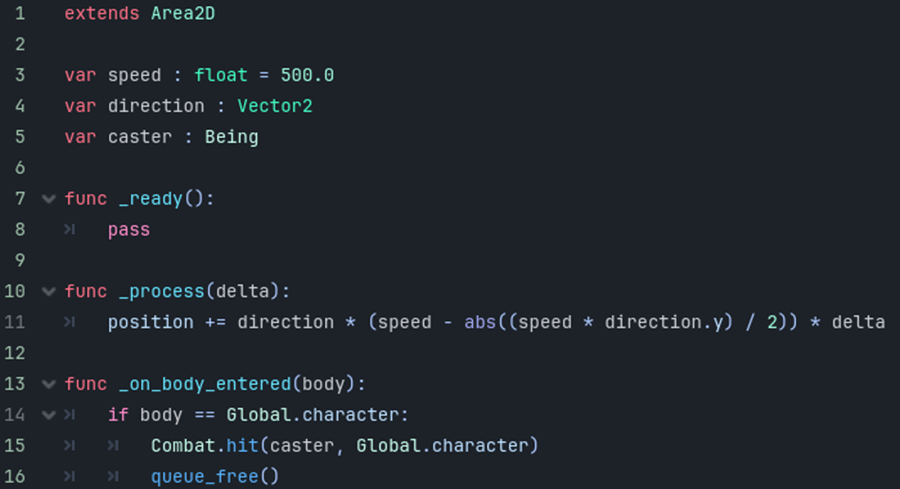
The script makes sure that object where it is attached moves towards random position with float speed of 500.0 – however, it’s moving vector direction is also applied to the speed so each bolt speed is randomized.
Signal “body_entered” that we connected manually from the node in this case, will check if there is collision with in-game object, if “true” it will check if object is player’s character so it can be damaged.
Skill Button
Skill buttons are commonly used in almost every RPG’s. Usually, they influence gameplay directly so it’s important to make them well.
Player’s character skills in this game are represented by dictionaries full of strings and numbers that are defining one skill.

Parent node TextureRect is frame of the button, its child TextureRect represents icon of the skill which is post-updated. TextureProgressBar in our case is visual output for attached skill’s cooldown. There is also Label child used to render integer within button of cooldown count down. And finally Timer node is used for countdown and provide value for both TextureProgressBar and Label.
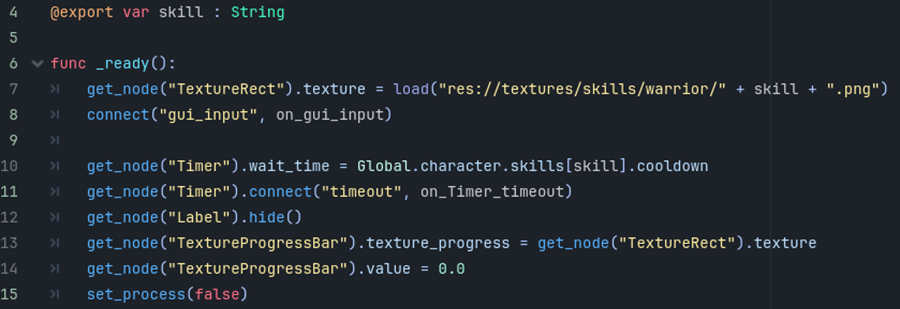
Exported variable of type String – “skill”, is name of the attached skill. It’s not only used to get to the skill’s dictionary but also to make sure that player’s character transit to the right state if all conditions are satisfied – we will get to them soon.
When skill is drag and dropped into button from the Skill Menu, “_ready” function will first place appropriate texture as it’s icon and then connect itself to the signal “gui_input” allowing user to press the button in order to use attached skill.
Then – by getting to the child node “Timer” we are setting its property “wait_time” to the cooldown value from the skill’s dictionary. And also connecting “Timer” to the signal, in this case “timeout”.
Since skill is just attached, its cooldown is “fresh” so we can get child “Label” and make it hidden via method “hide”.
Our circular representation of skill’s current cooldown also needs to be set. By getting to the node “TextureProgressBar” we first set its property “texture_progress” to be the same as the texture of the skill icon and also setting its value to float 0.0 – again, since cooldown is zero at the moment.
Lastly we set script’s “process” function to “false” – since this function runs only when there is cooldown counting.

As shown on the previous image, function “_process”, when active, will use Timer’s wait time as cooldown countdown to show it as text in the node Label. It will also make sure that node TextureProgressBar value follows the same timing by setting it’s value to the integer – which is result of Timer’s “time_left” divided by skill’s original cooldown.

You might wonder why use both “_process” and “_physics_process” function in the single script! Well, we needed to make sure that skill can’t be used if it’s mana requirement is not sattisfied by player’s character current mana pool. So we simply use “_physic_process” function to make sure to apply some red shades over entire skill button if there is no enough mana to cast it. We could also make this work via several other ways – one of them could be to use signals for each button and check for skill vs. player’s character mana current state and avoid constant looping of “_physics_process” function.
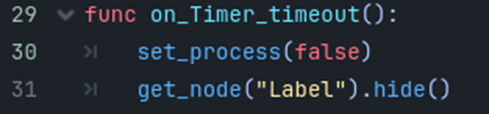
When cooldown countdown is over, thanks to the connected “timeout” signal – function “on_Timer_timeout” will be triggered, setting again “_process” to “false” and hiding the Label node.
The last function within “skillButton.gd” is “on_gui_input” connected to the button via signal “gui_input” under “_ready” function.
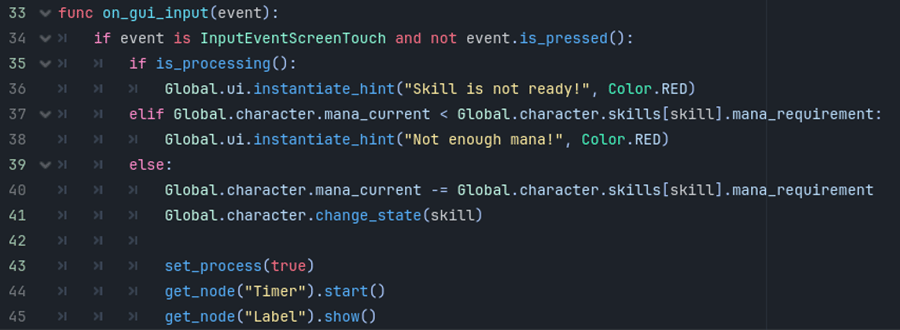
This allows skill to be used by player via touch screen input on the button. But before skill is activated and it’s state happens there are few statements that needs t be sattisfied.
First we check if function “_process” is running, if “true” it means that skill can’t be use at the moment since it’s cooldown is not ready. Then, player’s character also needs to have equal or more mana points than skill requires in order to cast it.
If function is not prevented by any mentioned condition skill can be casted by removing required mana points from the player’s character mana pool and make the same character to transit to the skill state by using it’s function “change_state” and providing string “skill” as argument.
Since skill is just casted, function “_process” also needs to start running, Timer needs to start counting cooldown which will make Label to be visible showing the countdown integer value.
Health and Mana Potion Buttons
Similar to the skill buttons, potion buttons contains the same function. However, since in this game we chose stable potion design – meaning that buttons for their use will always be on the screen and only limit oftheir usage will come from float cooldown from “character.gd.

Unlike skills cooldown, which is stored inside skill’s dictionary among other elements.
Function triggred by signal “gui_input” is a bit different since we need other kind of action to take a place. There is not transition to the state, instead we just set health/mana to it’s maximum value.
Note: We could use unique state as “drinking potion state” and even lock player to it’s animation during this event. However, in this game we are allowing player to restore health or mana fast by using potion and be right back to whatever else he was doing.
We could also play with the code within scripts: “potionButton_health.gd” and “potionButton_mana.gd” and make so that not all health or mana points are restored after its potions are used – maybe even increase restoring value by leveling.
Item’s Popup Info
What would be an RPG without items!
So let’s see how we output information of a item to the player, besides just having cool icon for it.
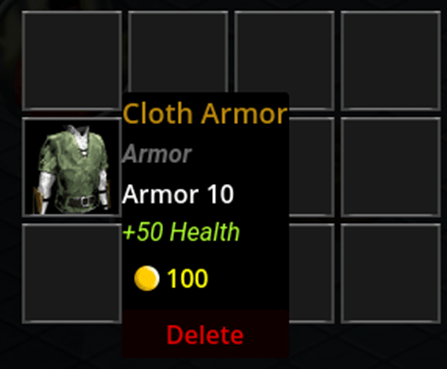
On the image above you can see how popup text looks when there is “gui_input” signal triggered on the item’s slot.

While item’s slot scene is simple scene with parent TextureRect as slot’s frame and its child TextureRect as item’s icon, its script is a bit long since it does have to track and triggers a lot of things. It is also unique class called “Slot” – all slots in the game will use it as their extension. Reason to have more than once slot script in the game is that there are many different places (dictionaries) where an item can be stored, like inventory, merchant, chest, etc. Each of them allows or not to their items to be drag and dropped to other place – for example, placing an item in the equipment slot from the inventory. So why put all in the one slot script and make it long code mess that can hardly be navigated, instead we just separate slots and make each available to do only what it can do. This way you will never have to worry about placing items from the merchant inside equipment slot since there is no code that will allow that.
Let’s see how class “slot.gd” works and looks.
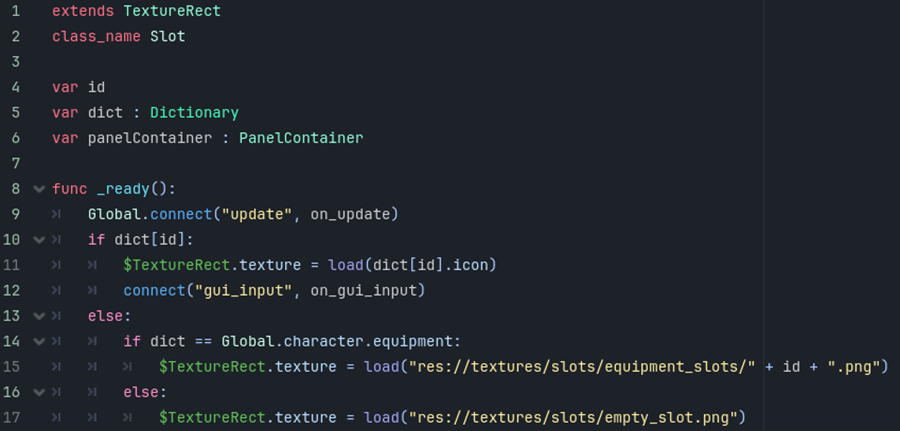
Variable “id” have no defined type. When stored in inventory, merchant menu or enemy loot – “id” will be integer and if item data is placed within player’s character equipment, it’s id will be unique, such as “mainHand”, since we need to compare item’s type and equipment’s slot type in order to avoid placing an item in the wrong equipment slot. So in this case, item’s “id” will be string.
In both cases “id” is key of next variable “dict” of type Dictionary.
For now we will skip explanation of “panelContainer” and get to it later on.
If there is item in the slot, function “_ready” will track item’s icon key by using “id” and load it to it’s child TextureRect as texture. If slot is empty, texture “empty_slot.png” will be loaded in the TextureRect as texture instead.
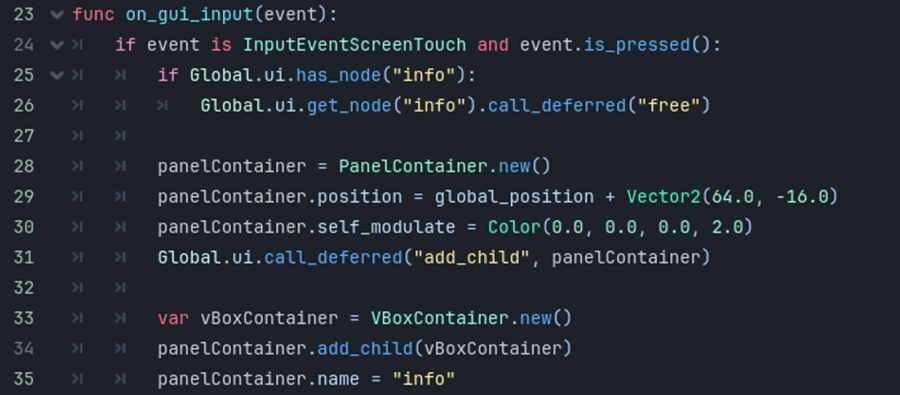
Function “on_gui_input” triggered by slot’s signal “gui_input” is what instantiate popup info with everything that can offer.
So first, in lines 24-26, it makes sure to close another popup info – if there is one. Avoiding to place two popup info nodes on the screen at the time.
Then, during lines 28-31, it will use existing variable of type “PanelContainer” to attac new PanelContainer node to it, make sure that position of it’s instant is right and add it as child of user interface – gameplay ui.
After PanelContainer is added we are adding another container as child of it – and that would be VBoxContainer.
Remember, we are using name of the PanelContainer info to check if it’s exist so that we can remove it before instancing another- that’s why it’s important to make sure that new PanelContainer name is set to “info”, as shown in code lines 33-35.
Now, when we have all containers and popup base node is on the screen, we are going to place in it all info nodes of the slot’s current item data.
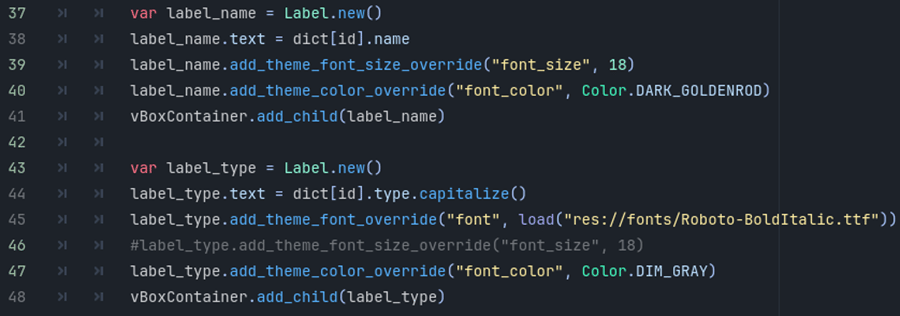
We start by making sure that name and type of the item are always added first – also, every item have name and type so there is no need to check if there is key “name” or “type” in dictianary before instancing Label node for it.
As you can see we are playing a little bit with different font colors, font data, font size in order to make an item’s popup text to be different from each other.
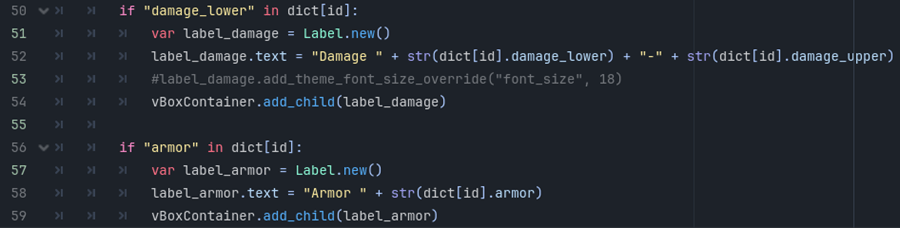
Now it’s time to add more Labels if item’s data contains one or more attribtes sucha as: “damage_lower”, “armor”, “power”, etc.
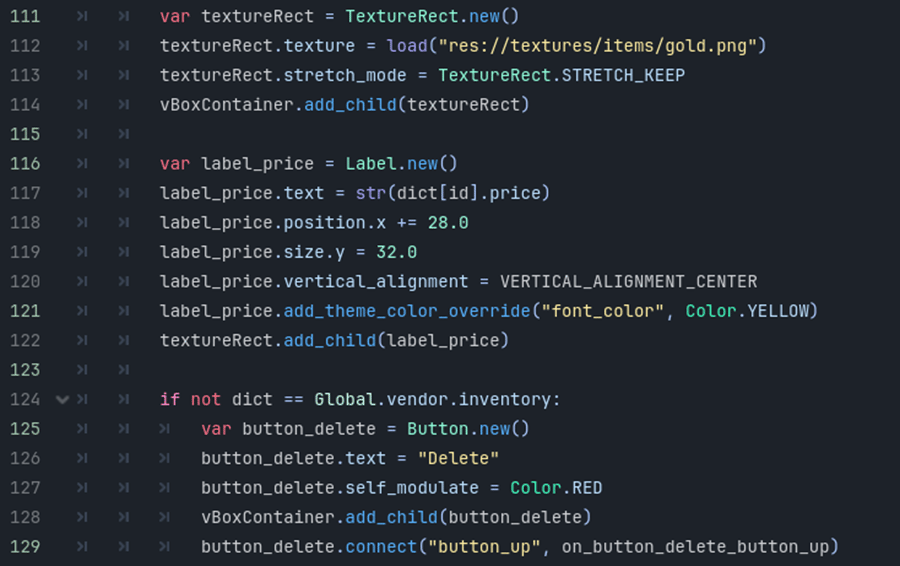
Another key that is always in the item’s dictionary is “price” – defining how much an item costs.
But instead of just placing an Label for it and making it’s text to something like: Price: n, we are going to instance a coin texture and place price next to it.
After that script will check if “dict” belongs to a vendor, and if “false” it will create and add button delete to the VBoxContainer, as well as connect it’s signal “button_up”.
In this game we don’t have ways to drop back item to the ground, we could always sell it to the merchant but sometimes we just want to remove it from the inventory.

Note: It’s important to instance button “delete” only when item is stored in player’s character equipment or inventory slots. Otherwise, player could delete an item from the merchants menu.

Function “on_update” triggers via global signal “update” – and it’s also triggered in the first line of the “_ready” function. Its purpose in this script is to make sure that “panelContainer” is removed if there are changes to the slot – making sure to clear popup info if such a action is needed.
Drag and Drop Data
One way to allow player to customize their skill buttons or simply place items in the inventory as wanted is to allow use of drag and drop of the slots, both skills and items. Code in both cases works very similar with one difference, and that is code line that checks if dragged data is allowed to be dropped to the targeting slot – preventing player to place skill slot in item slot or otherwise.
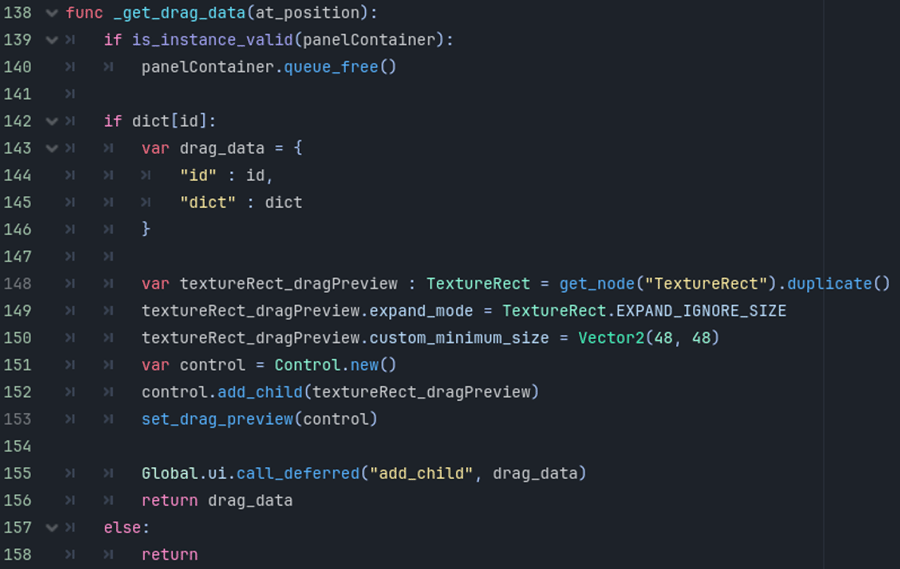
After the release PanelContainer which is our popup info node, there will be defined “drag_data” dictionary, which contains slots “id” and it’s “dict”.
We already have drag data process goin on in backend, now we need to add some visuals for the player!
We can do it by instancing duplication of TextureRect node and making it’s size a bit smaller so it vary from the slot from where it’s being drag, and finally returning the drag data as well as adding it to the current user interface.
Now we need to drop this data somewhere, let’s use empty inventory slot as example for data drop.
Before we check how function “_drop_data” works – it’s important to mention small pre-function “_can_drop_data”.

Godot’s function “_can_drop_data” of “slot.gd” script
Godot’s automatically check if data can be dropped via fucnction from the image above, before code progress to the “_drop_date”. However, we want some custom options there, like instancing warning hints when item data is targeted to the wrong slot, etc., so intead of using function “_can_drop_data” as checked, we will just place it as the part of “slot.gd” and by default it will always allow us to drop try to drop data.
Note: Adding previously described changes will bring some extra work in the each slot’s script under function “_drop_data” in order to prevent placing items of the one type in the other type of the slot, or as we already mention – placing skill in the inventory slot and otherwise, which will cause game to crash or make some serious game-breaking bugs.
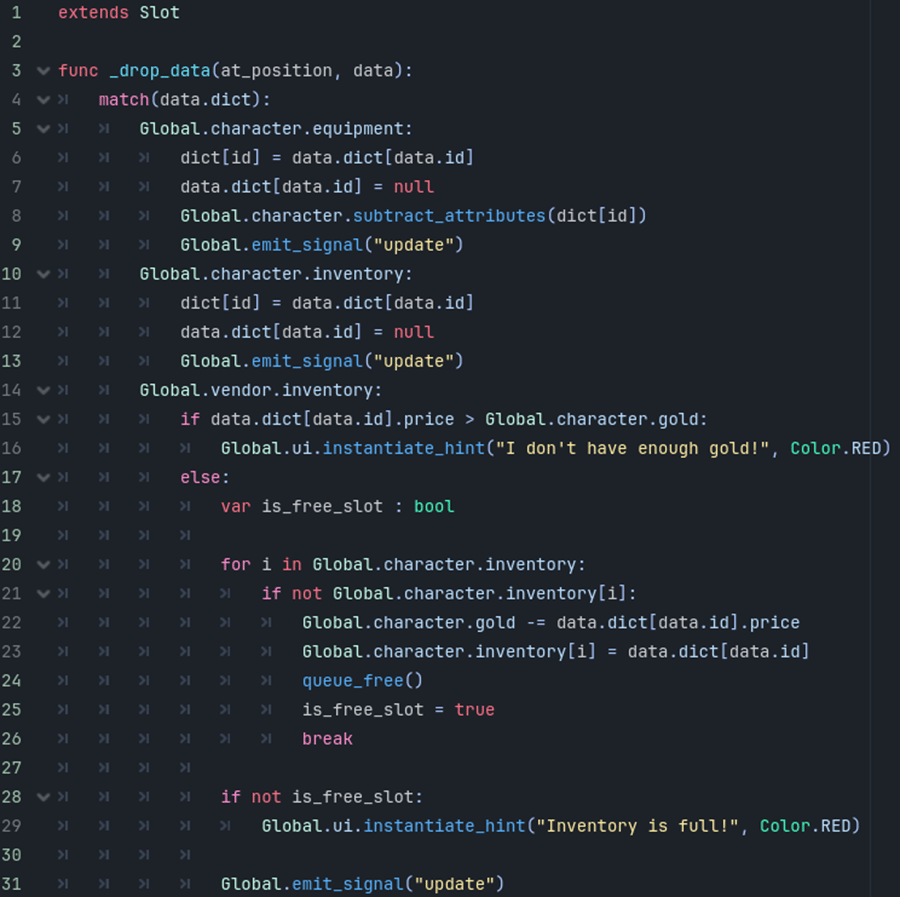
Function “_drop_data” is all about finding match for the data to be dropped to – if there is no match, dragged data will be released and gameplay user interface will print appropriate hint notifyng the player what just not happen.
Remember, this is empty inventory slot! Let’s see what happen when we pull data into it from different dictionaries.
From character’s equipment:
The match will occur in the line fifth, after what slot will set item’s (dragged data) as dictionary, before releasing it. And also make sure that dragged data is removed from the place from where it is dragged – this is important, othewise item data would be copied to the dragged slot and remain within slot from where it is dragged.
Since an item is being removed from equipment of the character- we need to make sure that character looses attributes which was item providing. We do this by simply passing items dictionary and “id” to the function “substract_attributes” from the “character.gd”.
Next we emit signal “update” from the “main” in order to update other nodes influenced by this change. Like stats list in the character menu, etc.
Note: Function “substract_attributes” from script “character.gd” as well as its opposite function “add_attributes” contains checkers for each attributes that one item can have. And if there is match it will increase/decrease it’s value with provided value from the passed dictionary.
From character’s inventory:
In this case an item being repositioned in the inventory from one slot to another empty slot. So what will happen is that targeted inventory slot will accept dragged data and then similar to the previous example, slot from where data is being dragged will remove it’s dictionary and set it to “null” becoming an empty slot.
From vendors’s inventory:
Taking item data from vendor’s inventory or buying item in other word is a bit trickier than it was case with equipment and inventory.
Besides placing dragged data within one dictionary and removing it from another we also need to few other things.
First, we must check if player’s character have enough gold to buy the item, if “false” data will be realeased and ui’s hint will be instantiated. However, if “true” we also need to check if there is enough space in the inventory, so the loop shown on the previous image will automatically find empty inventory slot and place data of the item inside it.
Note: You might not want to remove data from the dragged dictionary if it belongs to the vendors, since in most games vendors usually have infinite quantity of items that he is selling.
Check other parts of this series: