Game creation is a fun and rewarding activity, but it can be challenging for those who lack programming knowledge. With the rise of no-code solutions, however, it has become easier for non-programmers to create games. In this tutorial, we will guide you through the steps to create an online game creator using a no-code platform. The game creator will allow others to build their own games without any knowledge of coding. We will be using Bubble, a popular no-code platform, to build our game creator. By the end of this tutorial, you will have a fully functional game creator that can be used to create and publish games on various platforms.

Step 1: Setting up the Project
The first step in building our online game creator is to set up a new project in Bubble. Bubble is a no-code platform that allows you to build web applications without any coding knowledge. To get started, sign up for a free account on the Bubble website.
Once you have signed up for a free account on Bubble, create a new project and give it a name. You will then be taken to the Bubble editor, where you can start building your game creator.
Step 2: Designing the User Interface
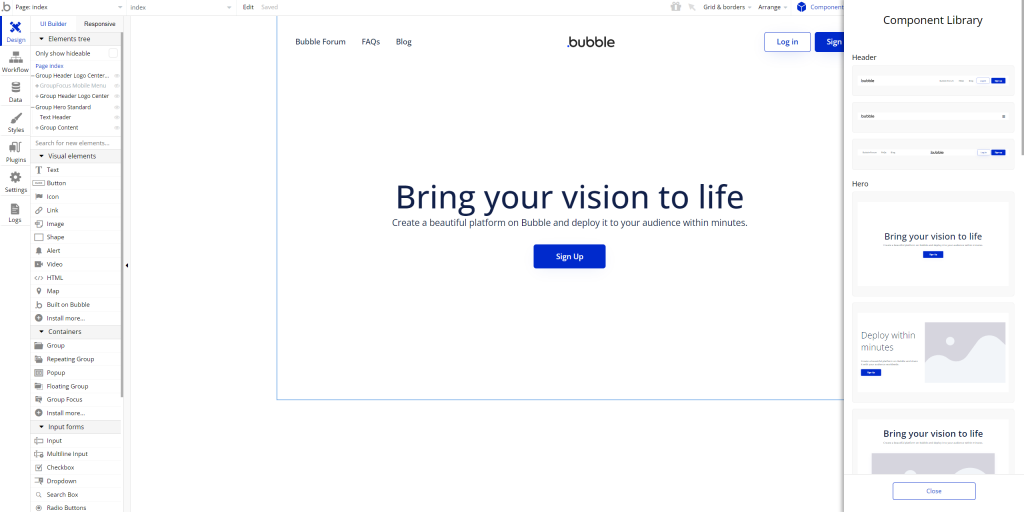
The next step in building our game creator is to design the user interface. We will start by creating a landing page for the game creator. The landing page will include a header with a logo and a navigation menu, a hero section with a call to action button, and a section that showcases some of the games created using our platform.
To create the landing page, we will use Bubble’s drag-and-drop interface. Simply drag and drop the elements you want to use onto the page and customize them to fit your design. You can use Bubble’s styling options to change the colors, fonts, and sizes of the elements on the page.
Step 3: Building the Game Creator
The next step is to build the game creator itself. This will involve creating a form that users can fill out to create their games. The form will include fields for the game’s name, description, genre, and other details. Users will also be able to upload images and audio files for their games.
To create the form, we will use Bubble’s form builder. Simply drag and drop the form elements onto the page and customize them to fit your design. You can also use Bubble’s data types to define the fields for the form and set up data validations to ensure that users enter valid data.
Step 4: Storing Data
The next step is to store the data entered by users in our game creator. We will use Bubble’s database to store the game data. The database will include tables for games, users, and other related data.
To set up the database, we will use Bubble’s data tab. From here, we can create new tables, define fields for those tables, and set up relationships between the tables. We can also define data validations to ensure that the data entered by users is valid.
Step 5: Publishing Games
The final step in building our online game creator is to enable users to publish their games. We will create a page where users can view and play the games created using our platform. We will also include a search feature that allows users to search for games by name, genre, or other criteria.
To create the game publishing page, we will use Bubble’s repeating group element. This element allows us to display a list of games on the page and customize the layout of each game card. We can also use Bubble’s search and filtering features to enable users to find games that match their criteria.
Step 6: Adding Game Mechanics
Now that we have the basic game creator set up, we can start adding game mechanics. Game mechanics are the rules and systems that govern how a game works. In our game creator, we will add a few simple game mechanics, such as the ability to move characters on a game board and the ability to collect objects.
To add these game mechanics, we will use Bubble’s visual programming interface. We can drag and drop elements onto the page to create a game board and character sprites. We can then use Bubble’s workflow editor to create rules for how the characters can move and how objects can be collected.
For example, we can create a rule that says when the player clicks on a character sprite, the character moves to a new location on the game board. We can also create a rule that says when the player collects an object, the object disappears from the game board and a score is added to the player’s total.
Step 7: Publishing to Various Platforms
Once we have added game mechanics, we can publish the games created using our game creator to various platforms. Bubble allows us to create web applications that can be accessed from desktop and mobile devices, so users can play the games on any device with a web browser.
We can also use Bubble’s integrations with other platforms, such as Facebook and Twitter, to publish the games on those platforms. This will allow users to share their games with friends and family on social media.
Step 8: Monetizing the Game Creator
Finally, we can monetize the game creator by offering paid features and subscriptions. For example, we can offer a premium subscription that gives users access to advanced game mechanics, such as multiplayer modes and custom game boards.
We can also offer paid features, such as the ability to add custom artwork to the game boards or to use custom sound effects. These paid features can generate revenue for our game creator and allow us to continue developing new features and improving the platform.
Conclusion
In this tutorial, we have shown you how to build an online game creator using a no-code platform. The game creator allows others to build their own games without any knowledge of coding. We used Bubble, a popular no-code platform, to build our game creator. We started by setting up the project, designing the user interface, building the game creator, storing data, publishing games, adding game mechanics, publishing to various platforms, and monetizing the game creator. By the end of this tutorial, you should have a fully functional game creator that can be used to create and publish games on various platforms.
