Info Popup
One of the common things in games is some kind of text output when an in-game object such as icon is hovered with the mouse.
“Info Popup” for Watering Can
In the next part we will explain how to achieve this step by step with Godot.
For the sake of explonation we will call it “Info Popup”.
Before we go and explain how to create it, there are two things we need to know.
First, this is an UI element that comes as main source of information, and as such it will always be rendered in front of any other node.
There are some exceptions, one would be the pause screen if game posses one.
And second, since text, images, etc., provided in the Info Popup will be unique for each element, we can’t use one single scene. Instead we will use script to create and control the entire scene – in other words, the only way to modify the scene will be by using the code.
Let’s go now and create our Info Popup.
All of this will happen within “slot.gd” script, one that are used to deal with all UI items such as inventory and hotbar icons.
In the script there are already two singals connected:
“Mouse Entered” and “Mouse Exited.
Under their functions we are going to place code for the Info Popup.
In short, when mouse enters the object info will be created and when it leaves the object, the info will be removed.
Under the function “on_mouse_entered” we will make structure explained forward.
The parent node will be PanelContainer and it’s child VBoxConainer inside what we are going to instace every text or image we need to show.
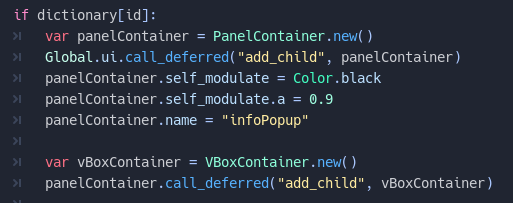
Creation of PanelContainer and it’s subnode VBoxContainer by script
As you can see, on the image above, there are other thing going on, except the very nodes creation so let’s explain them.
PanelContainer property “Color” is set to black color and it’s alpha channel will be 0.9 – meaning that background of the Info Popup will be black with little transperancy, you can play with this and see what works for you the best.
Then, we will set name of the PanelContainer to “infoPopup” – this is important because, later on we will use it to find the object and remove it by the name. And this is going to be pretty much all the time since only one InfoPopup can exist at the moment.
Now, when we have the base it’s time to place some info in it, mostly it will be fulfilled with different Label nodes and the first one will be what else than name of the object.
Remember, VBoxConainer will place all elements under each other so the first element added will always be at the position zero in the parent, so it will be on the top and this is exacly where wr are going to place name.
As well as PanelContainer and it’s child VBoxContainer, the Label will be created as a child of VBoxContainer as shown in the image below.

Creation of Label “Name” as Child of VBoxContainer
Here are also some other lines of code than just Label instancing.
Most of them are self explained, however it’s important to know that in order for “set” and “get” method to works we are going to need custom fonts added to the label.
We can also do it by script as shown in the next image.

Creation of DynamicFont by using script
As you probably figured out by now, this Info Popup is will be mostly used for item slots in hotbar and inventory.
Since in this game every item is dictionary which has name, category and price.
Naturally, we will repeat labeling process for all other listed strings, with some exception that are going to be explained.
Name should always be very clear so there is not mistaking it.
Category is less important but it’s nice to show to where an item belongs, is it seed, tool or something else. But it does not neet to be bold font as name, it can be italic, gray colored – less visible.
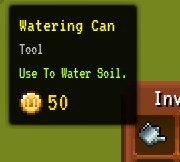
And to show price is well important!
Here we are going to show an coin image as direct representation of what numeric value in the end of the Info Popup means.
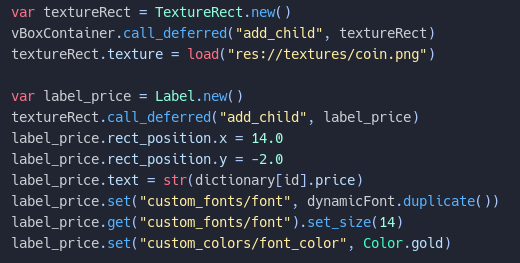
Creation of Label “Price” With An Image Element
The process of labeling price shown on the image above is mostly clear, exception is that Label is actually not added directly to the VBoxContainer but to the TextureRect (coin image) which is direct child of VBoxContainer.
Otherwise, if we added child to the VBoxContainer, it will be listed below coin image and we want it to be positioned next to it – this is also achieved by playing with the label’s properties “rect_position.x” and “rect_position.y”.
Another thing worth of mentioning is that some items are stackable, it means that they possess quantity besides name, category and price.
Labeling quantity is the same as name or category, however we need to make sure that it’s Label is instanced only if item is stackable in order to avoid crashes and errors by engine that will try to search for non-existing element.
After we are done with labels and everything else that we might be placing in the Info Popup, we need to find the place on the screen where PanelContainer will be rendered.
Usually this is next to the overpapped element – PanelContainer’s property “rect_global_position” should be used to place Info Popup on the wanted position.
In our case it looks like on the next image.

Positioning PanelContainer to the Position Next to the Inspected Element
And finaly, when an element is not overlapped by mouse anymore, we will use connected slot’s signal “on_mouse_exited” to search for the game’s UI node “infoPopup” in order to remove it.
For now Info Popup occurs only when item’s icons are hovered with mouse, but this feature can be expanded a lot more towards the other UI elements, such as inventory icon (hint of what inventorys is) or even in-game object like trees, etc.
Merchant and Shop UI
What would be point of an farming game if there aren’t some merchant or shop where we can sell gathered product.
In this game, merchant will be the NPC and shop will be UI panel that opens once when we interact with the merchant.
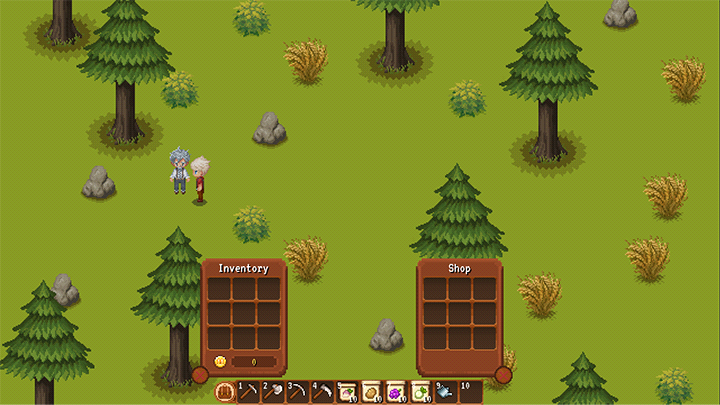
Merchant and Shop UI
Let’s start with the shop.
It’s very similar to the inventory scene except few things.
The first is that there aren’t gold indicator as well as the label that says Inventory – just rename it to “Shop”.
See also that is instanced on the right side of the hotbar – you can place it wherever you want, just make sure that doesn’t overlaps with with inventory.
It’s important too that we remove script from the slots positioned in shop’s grid container if we simply copy-pasted the shop scene to save us some development time.
Let’s now deal with the merchant.
It’s just like player or any other being in this game – KinematicBody2D with CollisionShape and AnimatedSprites nodes.
This one however, has Area2D as child as well – and it serves as Input detector for the player that triggers Shop instancing if player’s character is nearby or “warning hint” that tells the player: “It’s too far away!”
Besides “input” signal, we will play a little bit with the mouse entered and exited signal as well.
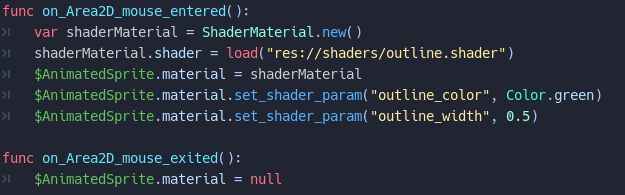
Shader Used to Outline the Merchant
Code shown above describes one way to use pre-made shaders in Godot.
What is done here is this: We use “mouse entered” singnal to place shader as material to the merchant’s AnimatedSprite node and remove it by using “mouse exited” signal.
The final result is shown on the image below.

Pre-Made Outline Shader in Action
To make sure that shop’s panel can’t be instanced from far away, and only when player is nearby merchant – we are using Godot’s build in method “distance_to”.
The same method can be used to close the shop’s panel if player wanderes far away from the merchant while shop’s panel is still on the screen.
Animal AI
Our animal choice for AI is chicken! It can idle, walk or lay eggs – and each of this is unique state.
Now, let’s make use of already existing StateFactory class. For our chicken it should look like on the next image.

State Factory Class for Chicken AI
With that said, we should also make some changes to the existing State.gd, in order to make it usable for the chicken too and not only for the player’s character.
Once when it’s modified it should look like it’s shown on the image below.
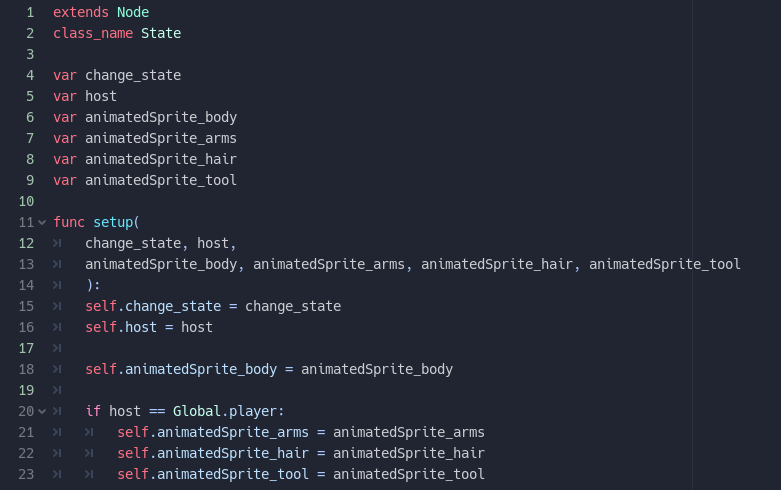
Modified State.gd
Since our chicken is KinematicBody2D with children AnimatedSprite and CollisionShape2D, it does not have AnimatedSprite nodes for arms, hair and tool.
That’s why we need to make sure that these nodes are not assigned to their variables in the State.gd if they are nor existing – once more, this is one way to avoid crashes and bugs without creating whole new “State” class especially for chicken.
As mentioned, chicken has three states: Idle, walk and nest.
All three states are unique scripts and classes just as every player’s state.
Idle is the simplest one – it contains timer with random “wait time” and signal for “timeout”. Once when signal is emitted, there will be random chance for the chicken to go in to the “Walk” or “Lay” state.
Chance should be much higher for the “Walk” state to occur, or maybe not – depends of what egg production rate you consider to be fine.
However for the sake of testing development, maybe it’s best to keep egg spawn chance higher.
Nest state is “Walk” – it also has timer as a child, created once when state is ready with the random “wait_time” and “timeout” signal.
It also uses “physics_process” build-in function where we make chicken to move and slide to the certain point until signal “timeput” is emmited.
Once when that happens, chicken will translate to the “Idle” state.
The last state is “Lay” – this one does not have a timer, it is over once when lay animation of AnimatedSprite ends.
At that moment chicken will go in to the “Walk” state and an egg will be created at it’s position, as pickable item.
This “simple” chicken AI give us clear structure of how an animal AI should look in this game.
And even new states for the chicken could be added, such as: Laying on the eggs to hatch a baby chickens, then state for taking care of them, etc.
Quantity and Gathering
Similar to the fruits which are gathered from the plants, eggs are product of the chickens that can also be picked up and placed in the inventory.
Fact that distinguishes materials and product from and axe or hoe is that these items can be stacked in one slot – only if the belongs to the same category.
So an egg can be added in the same slot where another egg is placed, same counts for materials as wood, rock, grass and seeds.
In this game we limmited maximum quantity to ten, so if there are slot in the inventory that contains ten eggs while we are picking up the eleventh, the another slot for egg stack will be created.
And so on, until there is no more empty slots in the inventory.
Price also goes up with quantity!

Chickens and Instanced Eggof Current Quantity One
Similar to the Info Popup, we want to avoid dealing with something if it does not exist.
Lines of the code shown in the next image are those that modifies quantity of an item if there is need for it.
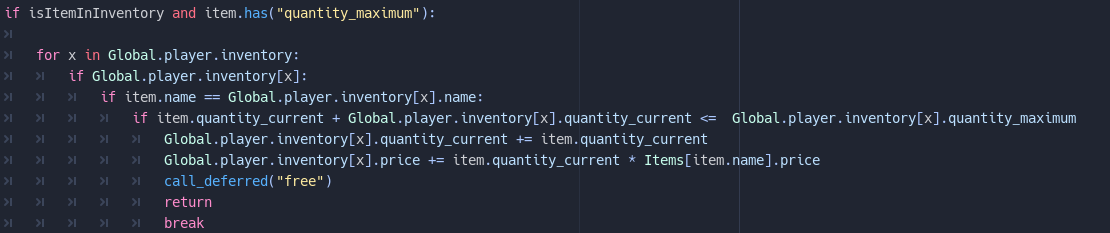
Lines of Code that Checks and Adds Quantity if there is Match
This part of the code comes between booleans “full” and “empty” slots.
Why check if there is full slot? Remember, there a chance for an item to be picked up (stacked) even if there aren”t free slots in the inventory.
There is also line of the code that shows how price goes up if quantity modification occurs.
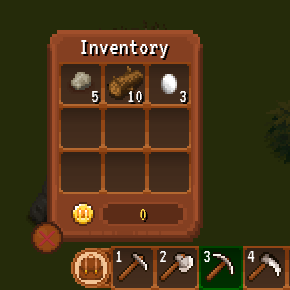
Current Quantity Represented by Inventory Slots
Simply enough, it just multiplays “quantity_current” with item’s original price – we pull that out from the Items.gd, where all dictionaries for items are nested.
If you recall, we never modifies these dictionaries, only duplicate them to the instanced items – so when there is quantity modification as well as pricing, it only applies to that one item.