Today, we’ll be diving into the world of creating a cutscene for your project. Throughout this article, you’ll get hands-on experience with two powerful tools: Cinemachine and Timeline. These amazing tools will grant you full control over your cutscenes, allowing you to seamlessly customize assets and bring your vision to life.
Not only that, but you’ll have the freedom to choose from a wide array of space-themed assets. This means you can truly personalize the cutscene, making it uniquely yours. Get ready to embark on a creative journey that will leave you with stunning cutscenes that capture the essence of your project!
Let’s get started and have some fun exploring the possibilities together.
Goals
By the end of this article, you’ll be equipped with the skills to compare and contrast various Timeline track types, recognize Timeline’s significance within Unity’s animation toolbox, and create animated sequences effortlessly without the need for additional scripting.
Moreover, you’ll gain a deep understanding of Cinemachine Virtual Cameras and how they differ from traditional Unity Cameras. Unlock the potential of Cinemachine to craft intricate camera movements without manual scripting, and even create your personalized camera movements for a unique touch.
In addition, you’ll discover the most common Cinemachine virtual cameras, seamlessly integrate Timeline with Cinemachine for captivating animated sequences, and direct cinematic sequences with your Timelines.
Cinemachine

Cinemachine is a powerful camera system designed to empower cinematographers, designers, artists, and anyone else working with cameras. It offers a user-friendly approach to creating sophisticated camera behaviors without the need for writing code. With Cinemachine, you can take advantage of various modules that work together harmoniously, allowing you to craft a wide range of camera experiences, from cinematic shots to fully automated in-game camera systems. Whether you’re a professional in the film industry or a game developer, Cinemachine provides an intuitive and efficient way to achieve the camera effects you desire.
Before the introduction of Cinemachine, camera movement was quite laborious, either requiring precise keyframing or complex scripting in code to achieve specific follow movements. This process was time-consuming and didn’t allow for quick adjustments and improvements. However, with the advent of Cinemachine’s ingenious “smart” camera modules, the whole process has become a breeze. Now, you can effortlessly establish dynamic relationships between the subject and the camera, just like a director does when looking through the lens, framing shots, and tracking the action.
Think of Cinemachine as your very own team of skilled camera operators, ready to follow your creative direction and capture the perfect shots, even if circumstances change unexpectedly. It liberates you from the technical intricacies, allowing you to focus on the artistic aspects of your project. Whether you’re a filmmaker or a game developer, Cinemachine offers an invaluable toolset to bring your vision to life with ease and efficiency.
Features
Cinemachine offers an array of amazing features that empower you to create film-like camera motion and seamless scene transitions.
Cinemachine is thoughtfully designed to seamlessly integrate into your projects without causing any unnecessary bloat. Unlike other systems, you don’t need to replace your existing camera setup. With Cinemachine, you can add its powerful features without disrupting your current workflow, making it a user-friendly and hassle-free addition to your creative toolkit.
One of the significant advantages of Cinemachine is its real-time functionality. As soon as you begin working on your project, it’s life and ready for action. This means you can make instant changes to various elements, such as characters, lighting, and camera positions, while you’re in the midst of production. The beauty of this real-time editing capability is that it eliminates the need for rendering wait times. You can visualize exactly how your content will look as you create it, helping you fine-tune your work and enhance the overall production process. Cinemachine truly streamlines your workflow and empowers you to focus on perfecting your vision without any unnecessary delays.
With Cinemachine, you have the creative freedom to craft custom virtual cameras tailored precisely to your needs. Whenever the situation calls for it, you can seamlessly activate these cameras in your project. Whether you want to achieve smooth blends between cameras or make quick cuts to a new perspective, Cinemachine makes the process effortless.
What’s truly impressive is the ability to script cameras to behave in specific ways based on certain conditions. For instance, picture a scenario where a character enters a vast and impressive room. With Cinemachine, you can instantly trigger the camera to shift to a different perspective, ensuring a better and more visually captivating shot for that specific moment.
By offering such versatility and control, Cinemachine empowers you to unleash your creativity and add that professional touch to your visual storytelling. The possibilities are virtually limitless, allowing you to create compelling and immersive experiences for your audience.
Cameras
With Cinemachine, you have the amazing ability to create custom virtual cameras that cater precisely to your creative vision. It’s like having a blank canvas for camera setups, where you can design and fine-tune each camera to perfectly suit the needs of your project. And the best part is, whenever the situation demands it, you can seamlessly activate these custom cameras to capture the exact shots you desire.
Whether you’re aiming for smooth transitions between cameras or want to cut to a completely different perspective, Cinemachine simplifies the whole process. It allows you to focus on the artistic side of things, making camera work feel like a breeze.
But the real magic lies in the capacity to script these cameras to react dynamically to specific conditions. Let’s paint a picture: imagine a scene where a character enters a grand and awe-inspiring room. With Cinemachine, you can script the camera to respond instantly to this event and shift to a new perspective, creating a visually stunning shot that enhances the impact of that particular moment.
Cinemachine hands you the reins to your creative journey, empowering you to infuse your projects with that professional touch. The possibilities are truly boundless, giving you the means to craft extraordinary and immersive experiences that captivate your audience and bring your storytelling to life.
Dolly Cart and track
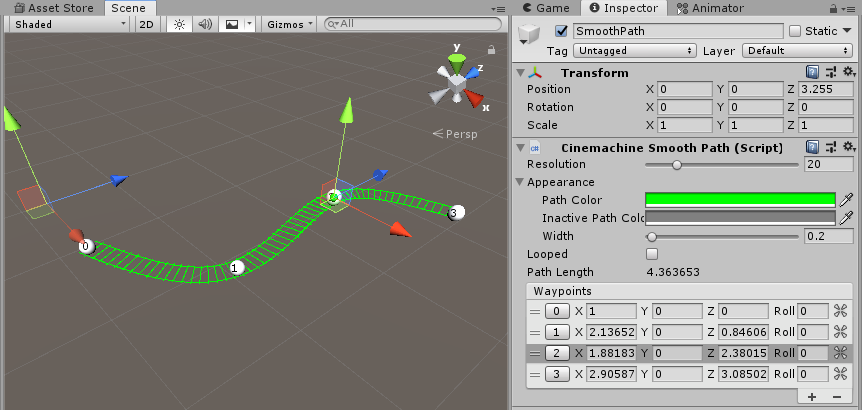
In cinematography, a “tracking shot” refers to a technique where the camera moves alongside the subject it’s filming. To achieve this shot, the camera is mounted on a dolly cart, which is placed on a track. As the scene unfolds, the camera smoothly moves along the track, creating a dynamic and engaging visual experience.
Within Unity’s Cinemachine package, you have the option to create tracking shots using a dolly cart and track. Cinemachine is a powerful and versatile automatic camera system designed for various purposes, such as in-game cameras, cinematics, cutscenes, film pre-visualization, and even virtual cinematography in eSports solutions.
To utilize the Track and Dolly feature in Cinemachine, you can set path waypoints that virtual cameras move between, allowing you to effortlessly track targets in your scenes. Rather than directly moving the virtual camera, you link it to follow the dolly cart, which smoothly navigates along the waypoint-based track you’ve set up in your scene.
There are multiple ways to control the camera’s movement along the track. You can manually keyframe the camera’s position, or you can use the convenient Cinemachine Auto Dolly feature. With Auto Dolly, the camera maintains a consistent distance from the subject, regardless of its movements. This can be particularly valuable during pre-production, as it lets you set up the shot and then tweak the subject’s performance as needed. Additionally, in games, this feature proves handy when you want to follow objects at varying speeds, giving you more creative freedom and flexibility.
Cinemachine’s Track and Dolly feature empowers you to capture cinematic and smooth tracking shots, enhancing your storytelling and gameplay experiences with seamless camera movement.
Brain
Cinemachine functions much like a skilled technical director overseeing multiple cameras in a Unity project. However, instead of dealing with conventional Standard Main Cameras, Cinemachine operates with what we call virtual cameras, often abbreviated as “vcams.” To make it work in your project, you’ll need the Cinemachine package, which you can easily download and import from the Package Manager.
Now, let’s dive into how Cinemachine operates. It primarily relies on the Cinemachine Brain component, which acts as the central control unit for the Unity camera. When you create a Cinemachine camera for the first time, the Cinemachine Brain is automatically added to the Main Camera.
With Cinemachine, you have a variety of ways to work with virtual cameras. You can animate them, smoothly blend between different vcams, utilize their procedural animation features, or even combine these techniques. Whatever combination you choose, the Cinemachine Brain takes all the camera animation and applies it to the Main Camera, resulting in the captivating shots you’re aiming for.
By leveraging the power of Cinemachine, you gain the ability to orchestrate complex camera movements and achieve professional-level cinematography in your Unity projects. It’s a fantastic tool that empowers you to take full control of your camera work and enhance the visual storytelling experience.
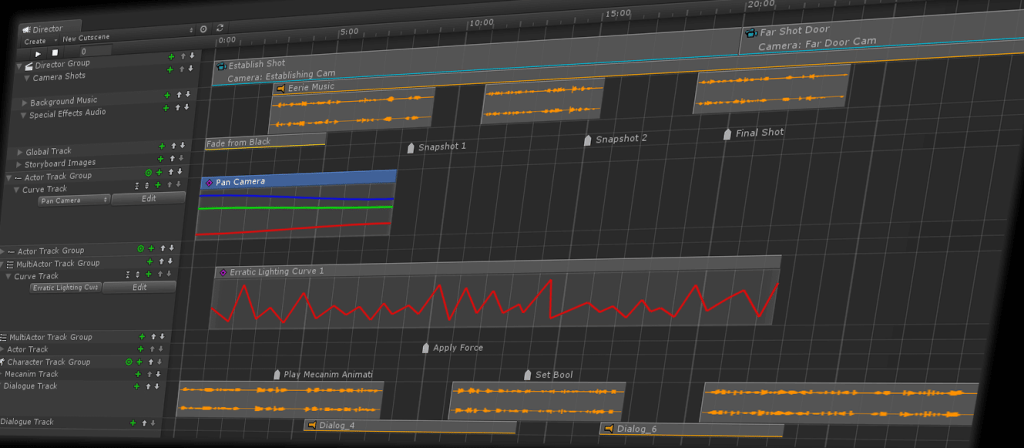
Timeline
The Unity Timeline Editor is a fantastic built-in tool that opens up a world of creative possibilities. With this powerful tool, you can effortlessly craft and edit cinematic content, gameplay sequences, audio sequences, and even intricate particle effects. It’s like having a complete studio at your fingertips!
In the Timeline Editor, you have the freedom to manipulate clips, moving them around on the Timeline, adjusting when they start, and determining how they should blend and interact with other clips on the track. This level of control gives you the flexibility to create seamless and captivating sequences that flow effortlessly.
When you work with the Timeline Editor, each Scene you create is composed of two essential components: a Timeline Asset and a Timeline instance. These components work together harmoniously to bring your creative vision to life. The Timeline Asset acts as the foundation, housing all your clips and tracks, while the Timeline instance is what you interact with in your Scene, bringing everything together seamlessly.
With the Unity Timeline Editor, the possibilities are endless. It’s a powerful and intuitive tool that empowers you to bring your ideas to life and create stunning visual and interactive experiences in your projects.
Tracks
Unity has six different types of tracks, seven if you have Cinemachine installed. Each Asset you control in this Timeline sequence is represented by its own track.
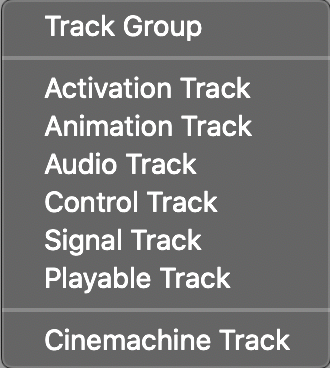
- Track Group lets you make a collection of tracks.
- Activation Track controls when to activate a track on the Timeline.
- Animation Track allows you to import existing animation clips or create an animation from scratch directly within Timeline.
- Audio Track allows you to import existing audio clips and make edits. Note that you cannot preview audio outside of Play mode.
- Control Track lets you take control of time-related elements of a GameObject, such as a PlayableDirector or a ParticleSystem.
- Playable Track allows you to trigger other timeline sequences.
- Signal Track establishes a communication channel between the Timeline and outside systems.
- Cinemachine Track Allows you to control Cinemachine cameras within the Timeline.
The configuration you need to know before the first cutscene
The first thing we need is to add the Cinemachine package. Go to the menu bar, and select Windows > Package Manager. Wait for all packages to load and then install Cinemachine.
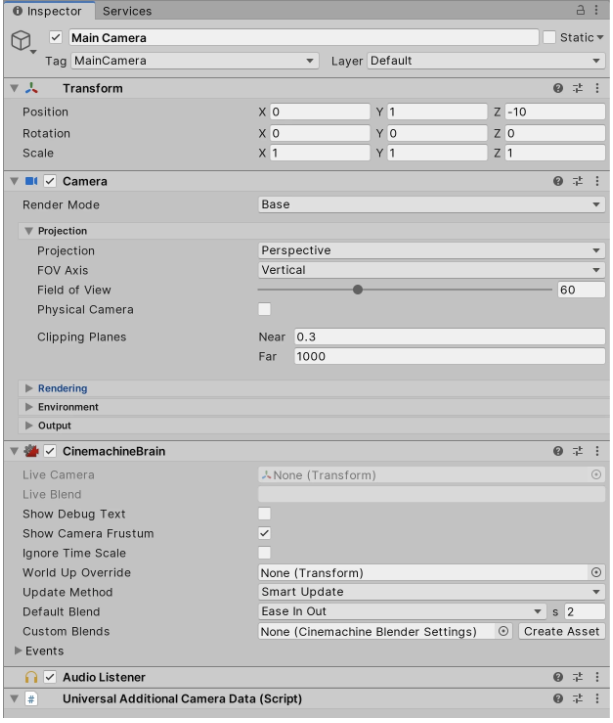
Adding cinemachine brain
The Cinemachine Brain serves as the central hub for all the other remarkable components of Cinemachine. Think of it as the conductor, orchestrating the whole ensemble. It takes the reins of the main camera and grants users the power to craft and manage multiple Virtual Cameras with ease.
With the Cinemachine Brain at the helm, you’re in command of your camera setups. You can effortlessly switch between various Virtual Cameras, each tailored to capture unique perspectives of your scene. This level of control empowers you to create seamless and visually engaging shots, elevating the quality of your content to new heights.
First, select the Main Camera in the Scene. In the inspector, press Add Component. Choose Cinemachine > Cinemachine brain.
Adding virtual camera
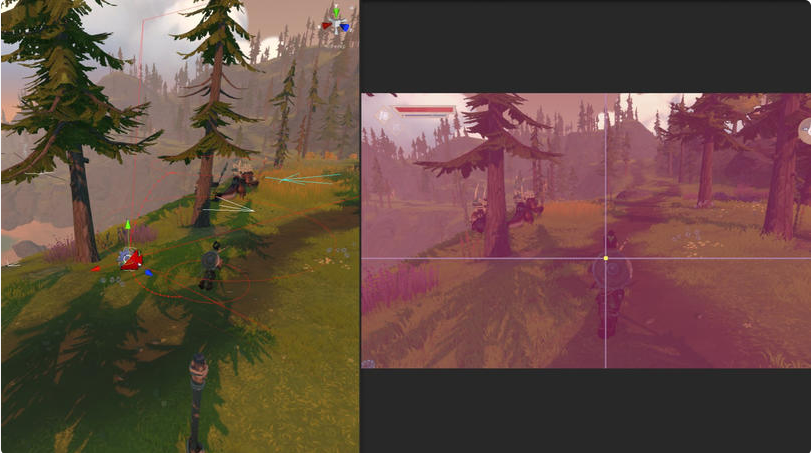
Virtual Cameras play a pivotal role in crafting specific camera behaviors and capturing shots with finesse when working with Timeline. When you’re in the Game view, you have the flexibility to fine-tune the behavior of the Virtual Camera using the Dead Zone and Soft Zone bounds. These bounds give you precise control over how the camera responds to movements and interactions in your scene. Additionally, you can further adjust these bounds by tweaking the Virtual Camera parameters, allowing you to achieve the perfect camera setup for your project. With Virtual Cameras at your disposal, you can truly refine and enhance the visual storytelling experience in your timeline-based projects.
In the Menu Bar, select Cinemachina > Create Virtual Camera. Select the Virtual Camera and assign a GameObject to the Follow and LookAt parameters. Then, select the Game view and adjust the Dead Zone bounds. Finally, adjust the soft zone bounds.
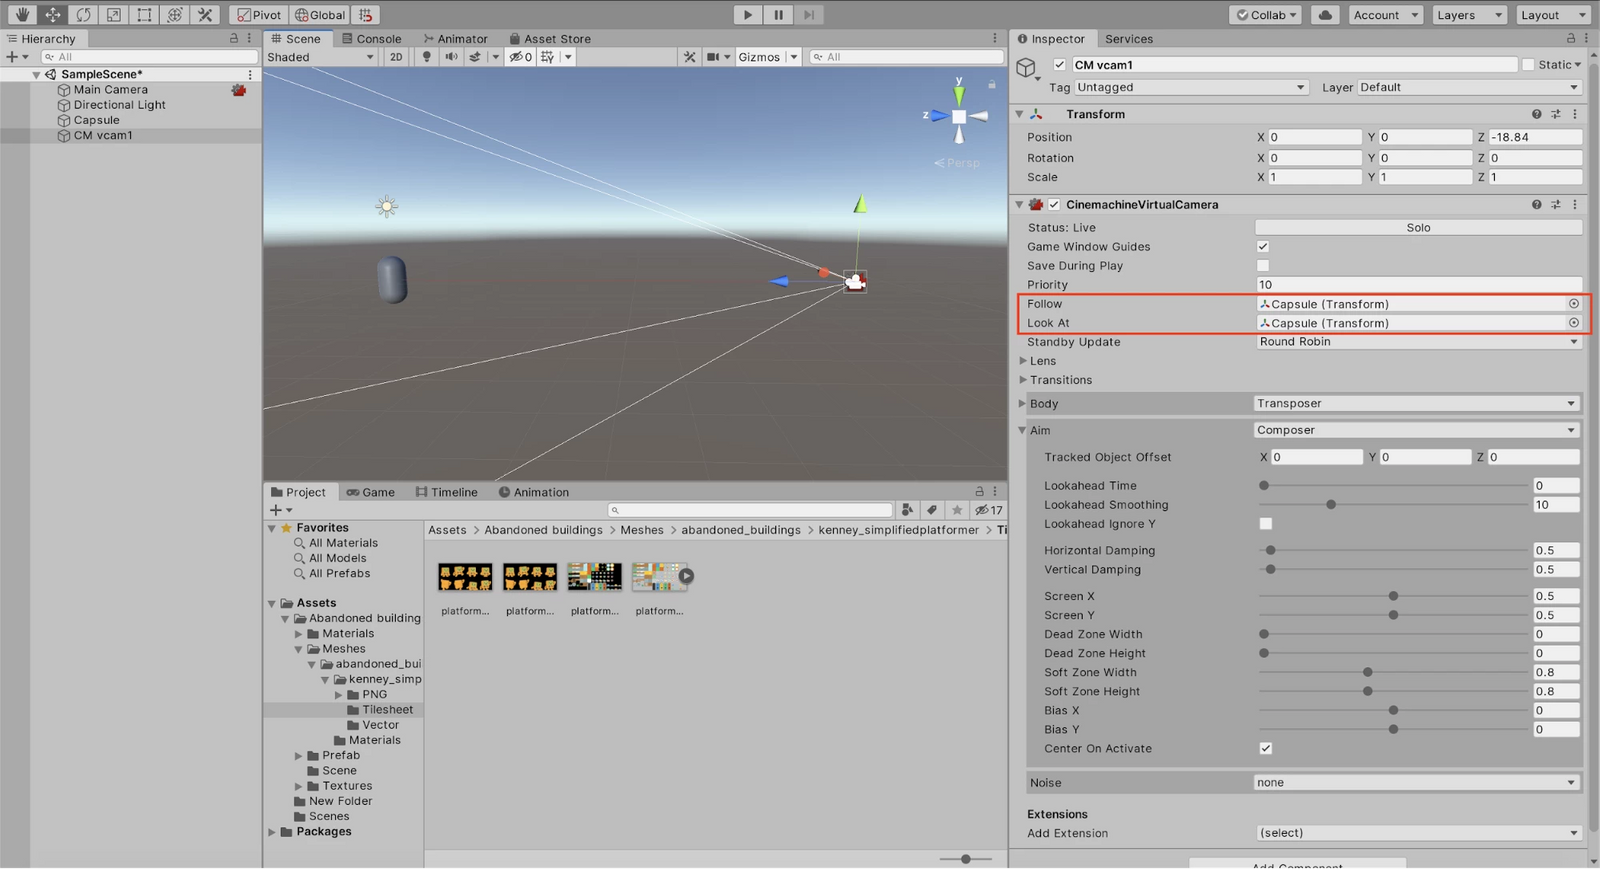
Virtual Cameras are a game-changer when it comes to creating specific camera behaviors and capturing visually stunning shots within the Timeline feature. They play a crucial role in elevating the overall quality of your project.
One of the most significant advantages of Virtual Cameras is the freedom they provide in fine-tuning camera behavior while you’re in the Game view. Thanks to the Dead Zone and Soft Zone bounds, you can precisely control how the camera responds to movements and interactions in your scene. This level of control allows you to achieve smooth and polished camera movements, adding a professional touch to your project.
Moreover, the beauty of Virtual Cameras lies in their versatility. You can further adjust the Dead Zone and Soft Zone bounds by tweaking the Virtual Camera parameters. This means you can customize your camera setup to perfectly match the specific needs of your project, ensuring every shot is nothing short of exceptional.
Adding Dolly Cart and track
To create a dynamic camera setup using Virtual Camera, you have the option to assign it to follow a dolly cart, and in turn, you can link the cart to follow a predefined track. This allows for smooth and precise camera movements along the designated path.
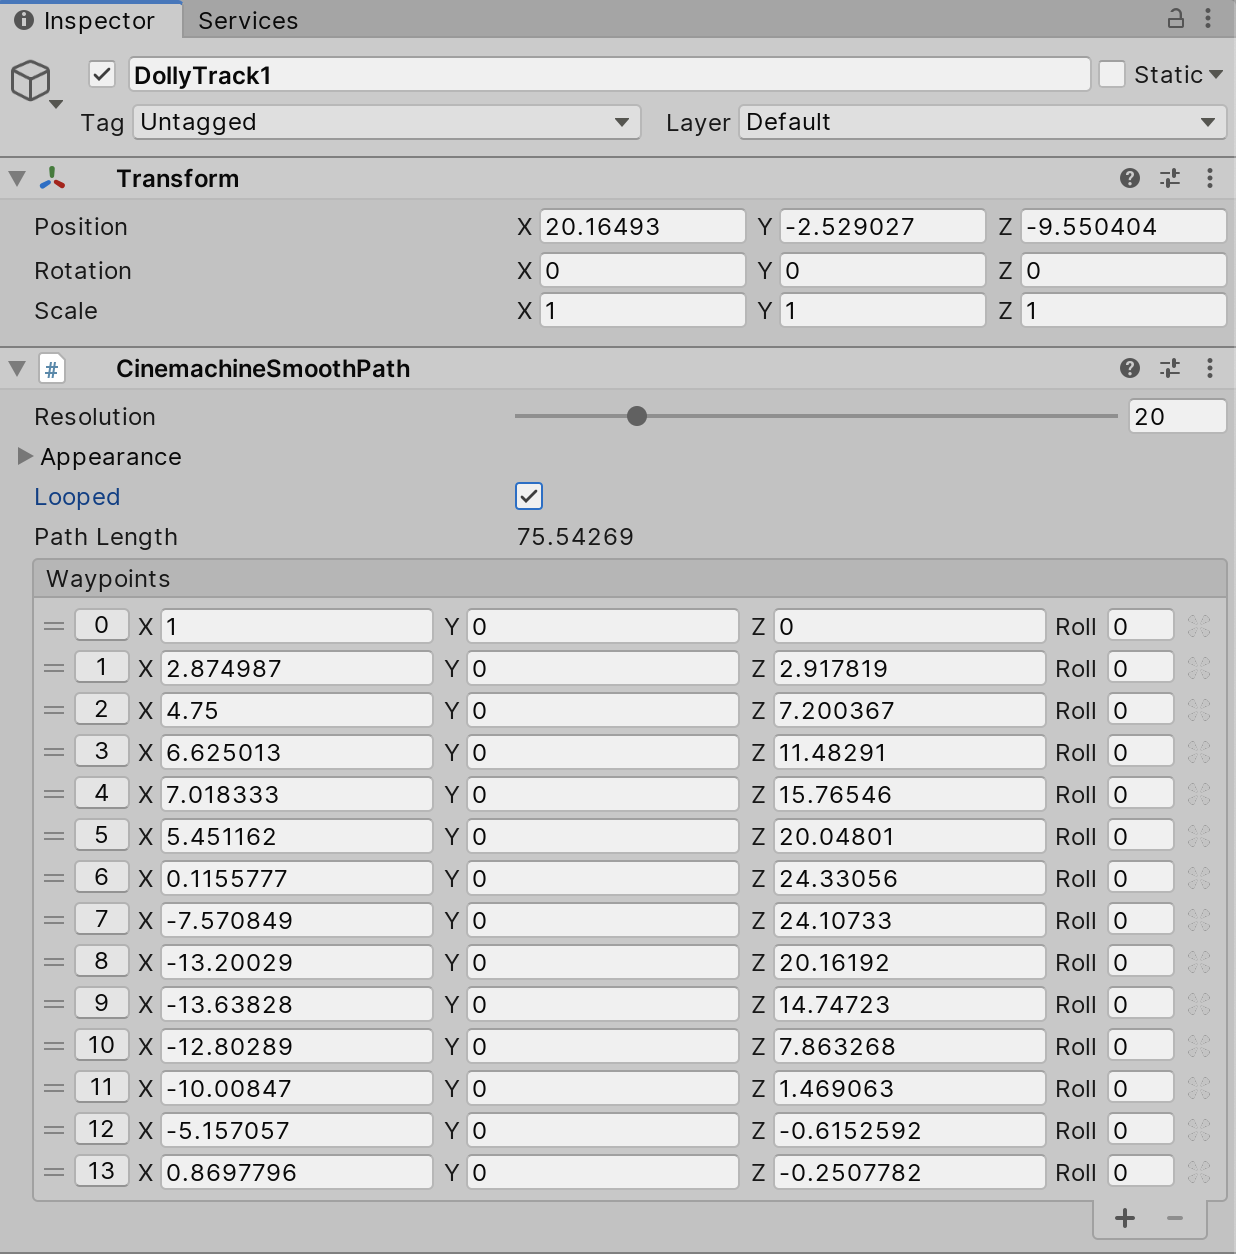
To set this up, start by creating the track with as many waypoints as you need. Each waypoint is defined by its Vector 3 position, providing the camera with precise guidance throughout the scene.
Next, from the Cinemachine dropdown menu, choose “Create Dolly Track and Cart.” This step establishes the necessary components for the dolly system.
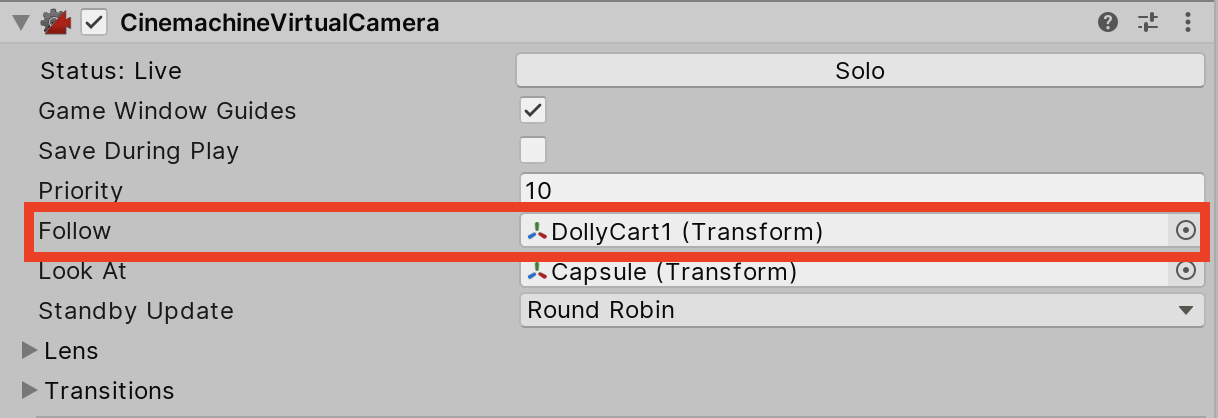
Now, select the Virtual Camera you wish to use and assign the Dolly Cart to the “Follow” parameter. By doing this, the camera will smoothly track the dolly cart’s movements along the track, allowing you to achieve the desired camera motion with ease.
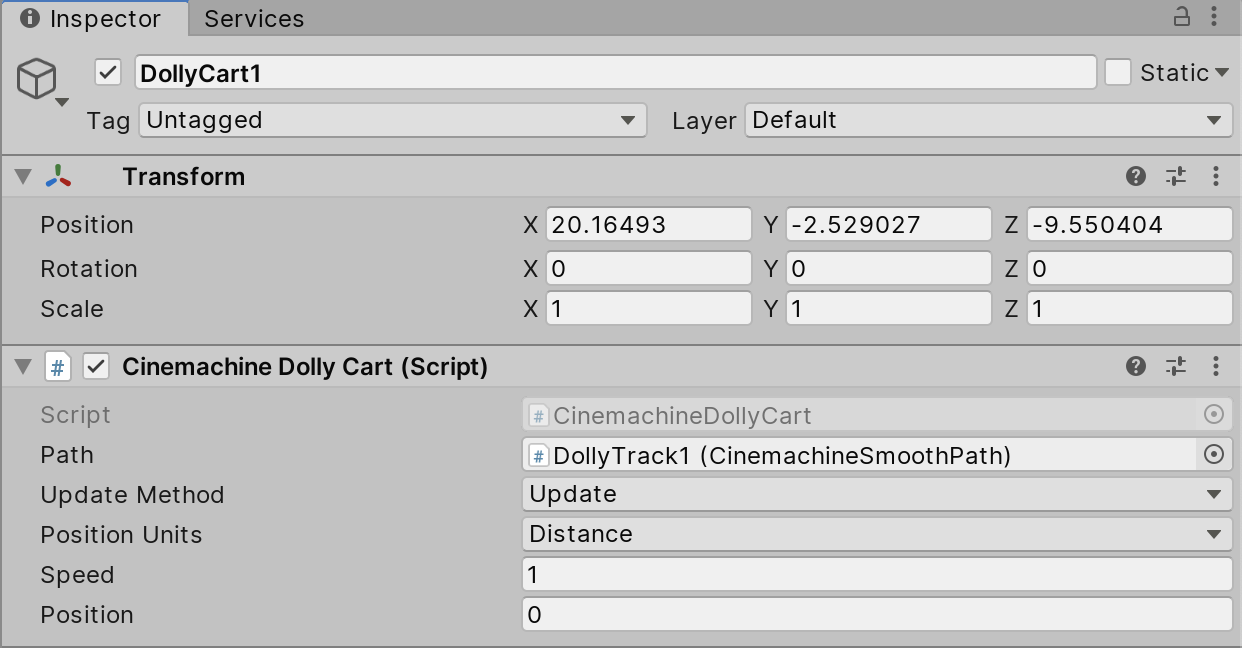
Select the dolly cart in the hierarchy and assign it to the path parameter. Adjust the Dolly parameters in the Update method, speed, and position on the track.
Finally, select the dolly track in the window and add a waypoints field to add as many as you need.
Timeline asset
In Unity, a Timeline Asset is essentially a collection of various media elements, such as tracks, clips, and recorded animations, that can be utilized in your project. These media elements could be sourced from external files, images, or even assets created within Unity itself, like an Animator Controller Asset or an Audio Mixer Asset.
On the other hand, a Timeline Instance is created when you associate a specific Timeline Asset to a GameObject by using a Playable Director component. It’s important to note that the GameObject to which the Timeline Instance is linked must have an Animator component. Also, worth mentioning is that the Timeline Instance is specific to the scene you’re working on.
In simpler terms, a Timeline Asset acts as a library of different media elements that can be used across various parts of your project. When you want to use a specific Timeline Asset in your scene, you create a Timeline Instance by connecting it to a GameObject through the Playable Director component. This connection allows you to control and manage the playback of the Timeline Asset within the context of that specific scene.
Conclusion
We’ve taken a deep dive into the captivating world of creating cutscenes for Unity projects. Armed with two powerful tools, Cinemachine and Timeline, we embarked on a hands-on journey to customize assets and bring our creative vision to life.
With Cinemachine’s ingenious smart camera modules, we gained complete control over camera movements, enabling us to establish dynamic relationships between subjects and cameras, just like a skilled director. The result was seamless blends and quick cuts between virtual cameras, elevating the overall visual storytelling experience to new heights.
Timeline proved to be another invaluable asset, empowering us to craft and edit cinematic content, gameplay sequences, audio sequences, and even complex particle effects. The freedom to manipulate clips and tracks allowed us to weave together seamless and captivating sequences that flowed effortlessly.
The fusion of Cinemachine and Timeline opened up a whole new world of possibilities. We were able to script cameras dynamically based on specific conditions, create custom virtual cameras tailored precisely to our needs, and orchestrate intricate camera movements. This creative freedom not only made our projects stand out but also added a professional touch to our visual storytelling, making the scenes come alive with depth and authenticity.
Throughout our creative journey, we were introduced to various types of tracks available in Unity’s Timeline, each playing a crucial role in managing assets within our sequence.
This article served as a comprehensive guide, equipping us with the skills to compare and contrast various Timeline track types, maximize the potential of Cinemachine’s Virtual Cameras, and expertly direct cinematic sequences with our Timelines.
With our newfound knowledge and skills, we are now ready to unleash our creativity and take our Unity projects to new heights of excellence. By harnessing the power of Cinemachine, Timeline, and various other tools at our disposal, we have the potential to create immersive and compelling experiences that captivate our audience and bring our stories to life in the most extraordinary way.
So, let’s embark on this thrilling adventure and create remarkable cutscenes that truly capture the essence of our projects, immersing our viewers in a world of awe and wonder!