Creating a game with Unity is always an amazing experience. When it comes to incorporating multiplayer capabilities, online features, and the ability to save user progress or items in an external database, it’s essential to have a good understanding of REST, Node.js, database systems, and Unity.
In this article, we will explore the process of building a server using Node.js that connects to an external database and seamlessly integrates it with Unity.

https://github.com/catkeydev/unity-restarticle
What is a REST API?

Imagine you have two different software applications that need to talk to each other over the Internet. They need a way to communicate and share information. That’s where REST API comes in.
REST API is like a set of rules and protocols that allows these applications to talk to each other smoothly. It’s really popular because it’s easy to use and works well with different programming languages and platforms.
To understand the concept of REST API, let’s delve into the notion of resources.
A resource can encompass any piece of information or entity that you wish to access or modify through the API. It could have user details, a product listing, or any other item that applications need to interact with. Every resource is assigned a unique address known as a Uniform Resource Identifier (URI). Think of it as a specific location where the resource can be located. Just like each house possesses its own address, each resource possesses its own URI.
Now, how do you engage with these resources? You employ different methods, similar to undertaking various actions. In REST API, we employ methods such as GET, POST, PUT, PATCH, and DELETE.
Another aspect of REST API is its statelessness. This implies that each request you send to the API includes all the necessary information for the server to comprehend and process.
If you want to go more in detail I recommend this article.
What is a Node.js?
Node.js is a powerful tool that allows developers to use JavaScript, a popular programming language, outside of web browsers. Normally, JavaScript is used for things like making websites interactive, but Node.js lets you use JavaScript to build server-side applications and other types of software.
What’s cool about Node.js is that it uses a special way of handling tasks that makes it really efficient. It can handle lots of things happening at once without slowing down. This is because Node.js uses an event-driven model, which means it can keep doing other things while waiting for something to finish.
For example, let’s say you’re building a chat application where multiple users can send messages at the same time. With Node.js, you can handle all those messages simultaneously without any problems. It won’t get stuck or slow down, thanks to its clever way of managing tasks.
Another great thing about Node.js is its huge library of pre-made code called npm. It’s like a big collection of building blocks that developers can use to make their work easier. Instead of starting from scratch, you can find ready-made solutions for many common tasks, like handling databases, making HTTP requests, or working with files. This saves a lot of time and effort!
To sum it up, Node.js lets developers use JavaScript to build all sorts of applications, not just for the web browser. It’s fast, efficient, and has a big community of developers supporting it. With Node.js, you can create powerful and scalable software without needing to learn a completely new programming language.
Now let’s get our hands to work!
Creating the Node.js server
To begin, we wanna initiate our node project file and install express and body-parser packages. Open the terminal and go in the direction you wanna create your project.
$npm init
$npm install express
$npm install body-parser
Let’s create an entry point file called “index.js”. Open your preferred code editor and create a new file with this name. Once you have the file open, we can start writing the initial lines of code.
const express = require('express');
const app = express();

app.use(bodyParser.json());
app.use(
  bodyParser.urlencoded({
    extended: true,
  }),
);

app.get('/', (req, res) => {
    res.send('Hello Fungie devs');
})

app.listen(3000, () => console.log('started and listening.'));
Now let’s test it before switching to Unity. Open your terminal.
$node index.jsCool! We have our server running.

Go to your browser or Postman to test our address.
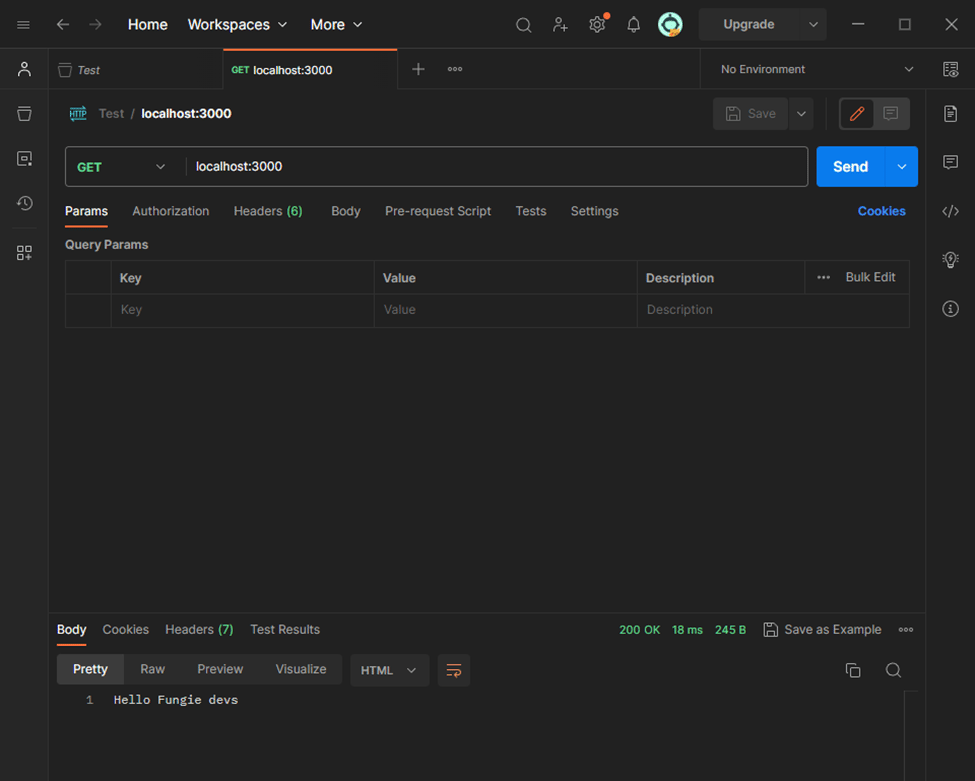
Yes! it’s working. So we have made a service working but now how do we do in Unity?
Testing our server in Unity
To get started, let’s open an empty Unity project.
First, let’s create an empty GameObject in the Unity editor. Right-click in the Hierarchy window and select “Create Empty” to generate a new empty GameObject. This will serve as a container for our script and allow us to attach components as needed.
Next, we need to create a C# script in the project folder. Locate the project folder in your file explorer or within the Unity editor’s Project window. Right-click on the folder and select “Create” followed by “C# Script” to generate a new script file. Name the script file “TestClient.cs”.
With the script file created, you can now open it in your preferred code editor to begin writing the code.
using UnityEngine.Networking;
using UnityEngine;
using System.Collections;

public class TestClient: MonoBehaviour
{
    public string url;

    void Start()
    {
        StartCoroutine(Get(url));
    }

    public IEnumerator Get(string url)
    {
        using (UnityWebRequest www = UnityWebRequest.Get(url))
        {
            yield return www.SendWebRequest();

            if (www.result == UnityWebRequest.Result.ConnectionError)
            {
                Debug.Log(www.error);
            }
            else
            {
                if (www.isDone)
                {
                    var result = System.Text.Encoding.UTF8.GetString(www.downloadHandler.data);
                    Debug.Log(result);
                }
                else
                {
                    Debug.Log("Error! data couldn't get.");
                }
            }
        }
    }
}
Add the script to the empty game object and hit play.
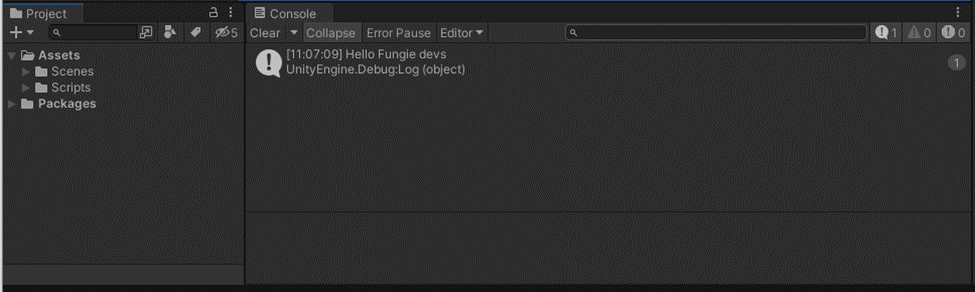
We now see the information on the console. That’s amazing! Now let’s meet JsonUtility class to parse our data.
Parsing data in Unity
The JsonUtility class in Unity serves as a helpful tool for dealing with JSON data. JSON is a widely used format for lightweight data interchange, allowing data to be easily serialized and communicated across various platforms and programming languages.
With the JsonUtility class, Unity provides with a convenient way to convert JSON data to C# objects and vice versa. But first, let’s send our data from the Node.js server.
const express = require('express');
const app = express();
app.get('/', (req, res) => {
res.send('Hello Fungie devs');
});
let user = {
"name": "fungiedev",
"currency": 100,
"level": 25
}
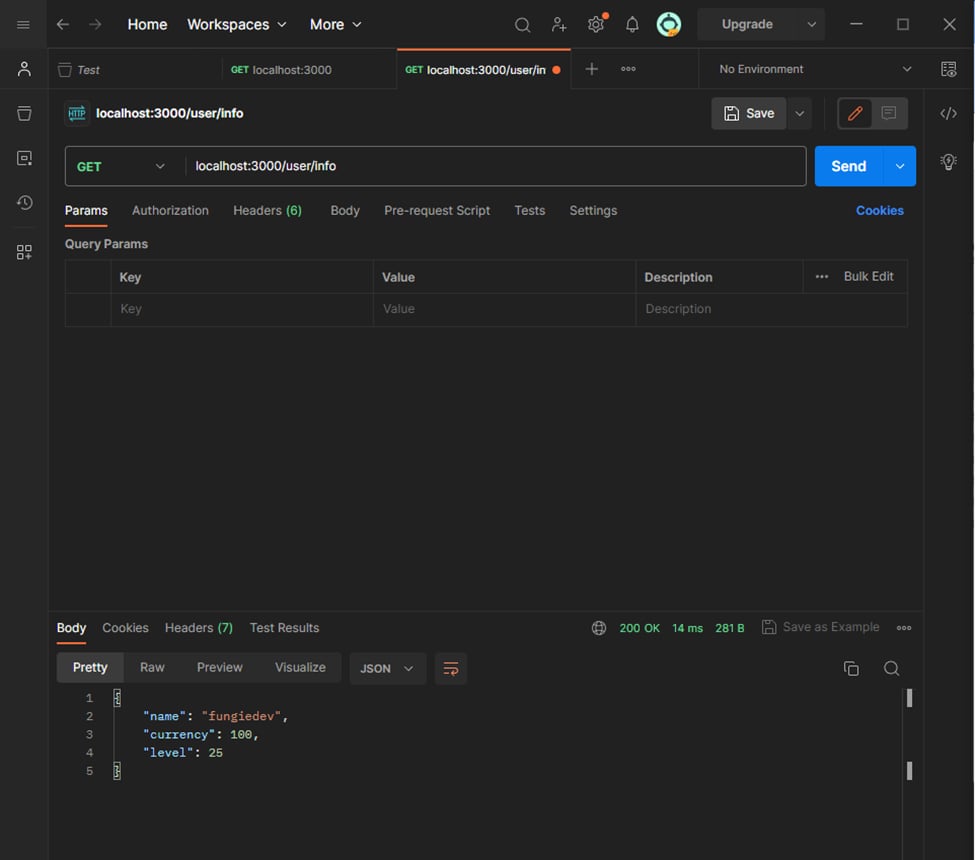
app.get('/user/info', (req, res) => {
res.send(user);
});
app.listen(3000, () => console.log('Started'));
As we currently don’t have a database set up, we can simply define a JSON object within our “index.js” file. We will then send this object back to the client.
To proceed, let’s restart the local server. Open your terminal or command prompt, navigate to the project directory, and initiate the server once again.
Once the server is up and running, we can proceed with testing the API request to localhost:3000/user/info.
Now that we’ll be receiving data through our REST API, we need to create a simple C# class to represent an instance of the model class that we receive when retrieving data.
Create a new C# class in our Unity project. We’ll define the necessary properties and methods to handle the data effectively. This class will mirror the structure of the model class received from the API.
public class User
{
    public string name;
    public int currency;
    public int level;
}
In the get method we are gonna add the JsonUtility method and log the results.
{
    if (www.isDone)
    {
        var result = System.Text.Encoding.UTF8.GetString(www.downloadHandler.data);

        var user = JsonUtility.FromJson<User>(result);

        Debug.Log("User name: " + user.name);
        Debug.Log("User currency: " + user.currency);
        Debug.Log("User level: " + user.level);
    }
    else
    {
        Debug.Log("Error! data couldn't get.");
    }
}
We got it! We’ve obtained the data and stored it within an object. This means we have complete control over how we handle and manipulate the data. We are now free to process the data in any way that suits our needs and requirements.
Updating data from Unity
Now that we have successfully obtained the data, it’s time to enable the capability to update the data as well. To achieve this, we will create a new endpoint called /user/create specifically for handling data updates. We will send all the necessary data through the body of the HTTP request.
In addition, to simulate user data, we will create a fake array to store the details of the created users. This array will serve as a temporary storage solution, allowing us to keep track of the users that have been added or modified.
let createdUsers = [
    {
        "id": 0,
        "name": "test0",
        "health": 10,
        "attack": 25
    },
    {
        "id": 1,
        "name": "test1",
        "health": 10,
        "attack": 25
    }
]
app.post('/user/create', (req, res) => {
    let newUser = {
        "id": req.body.id,
        "name": req.body.name,
        "currency": req.body.currency,
        "level": req.body.level
    };

    createdUsers.push(newUser);
    console.log(createdUsers);
    res.send(createdUsers);

});
Again, open a terminal and start the server.
$node index.jsLet’s first try it using Postman. Set header and body to application/json and make a user JSON string based on the user schema.
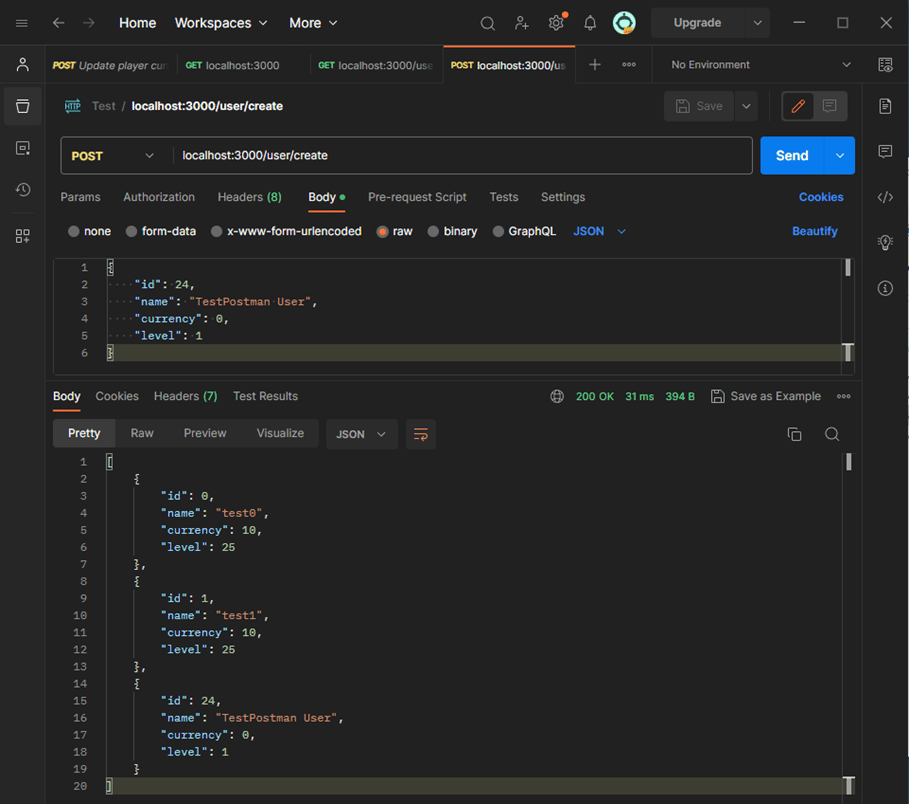
We have accomplished the task of receiving a JSON object and effectively updating our data structure accordingly. It’s important to note that while JsonUtility is a useful tool, it does have some limitations. One particular limitation is that there isn’t an out-of-the-box solution for sending a JSON array and parsing it directly in Unity.
That’s why I provide you with a utility that offers a workaround for this limitation. This utility will simplify the process of sending a JSON array and parsing it within Unity. Now you can seamlessly handle JSON arrays without having to overcome the limitations posed by JsonUtility.
For more details look here and here.
To make this trick possible we’ll create a static class named KeyUtils.
using UnityEngine;
using System.Collections.Generic;

public static class KeyUtils
{
    public static List<T> FromJson<T>(string json)
    {
        Wrapper<T> wrapper = JsonUtility.FromJson<Wrapper<T>>(json);
        return wrapper.result;
    }

    [System.Serializable]
    private class Wrapper<T>
    {
        public List<T> result;
    }
}
The FromJson method provides a way to deserialize JSON data into a list of any class we define. This method is especially useful when we receive an array of JSON objects from the server.
It’s worth noting that in order to enable Unity’s JSON conversion functionality, we need to mark our User class as Serializable. This attribute allows Unity to recognize and properly handle the serialization and deserialization process for our class. By making the User class serializable, we ensure that Unity can seamlessly convert instances of the class to JSON format and vice versa.
With the FromJson method and the Serializable attribute in place, we can confidently handle JSON data and work with arrays of JSON objects in a straightforward manner. This empowers us to efficiently process and utilize data from external sources within our Unity application.
You can find more about the Serializable concept here.
Now with all this done, we can create a post method inside our Client script in Unity. It will take two parameters, the URL and the data to update.
public IEnumerator Post(string url, User user)
{
  var jsonData = JsonUtility.ToJson(user);
  Debug.Log(jsonData);

  using(UnityWebRequest www = UnityWebRequest.Post(url, jsonData))
  {
    www.SetRequestHeader("content-type", "application/json");
    www.uploadHandler.contentType = "application/json";
    www.uploadHandler = new UploadHandlerRaw(System.Text.Encoding.UTF8.GetBytes(jsonData));
    yield return www.SendWebRequest();

    if (www.isNetworkError)
    {
      Debug.Log(www.error);
    }
    else
    {
      if (www.isDone)
      {
        // handle the result
        var result = System.Text.Encoding.UTF8.GetString(www.downloadHandler.data);
        result = "{\"result\":" + result + "}";
        var resultUserList= KeyUtils.FromJson<User>(result);

        foreach (var item in resultUserList)
        {
          Debug.Log(item.name);
        }
      }
      else
      {
        //handle the problem
        Debug.Log("Error! data couldn't get.");
      }
    }
  }
}
To test, let’s create a new user in the start method and call the post request.
void Start()
{
    var newuser = new User() { id = 10, name = "Unityuser", currency = 0, level = 0 };

    StartCoroutine(Post(posturl, newuser));
}
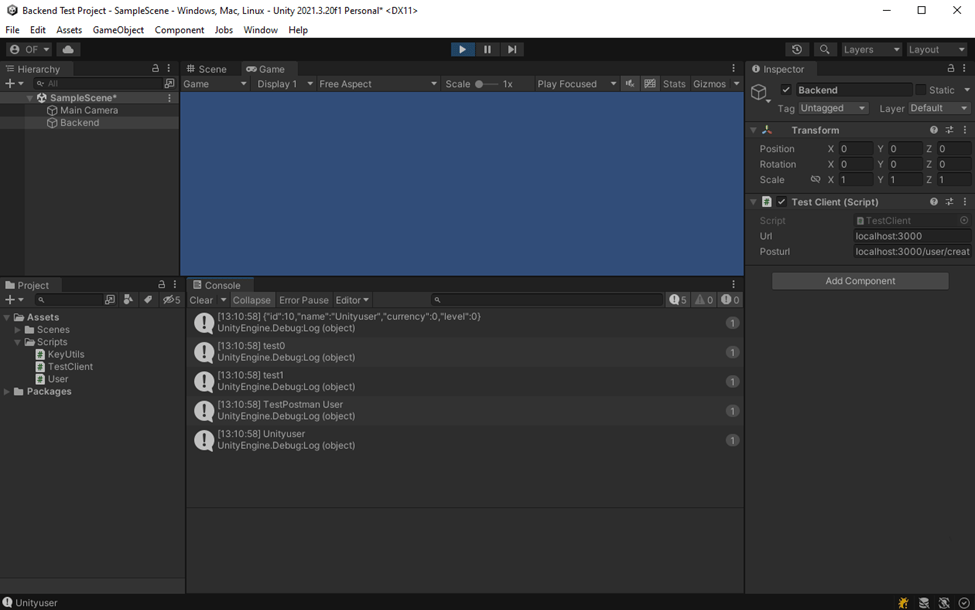
Great job! We got everything running. Now, it’s time to take the next step and set up a real database to store and manage your data using MongoDB. This will provide a more robust and reliable solution for your application.
Creating our MongoDB
MongoDB, as a contemporary database, was designed with a focus on cloud-based operations. It boasts built-in functionalities that facilitate maintaining high availability and effortless scalability through distributed workloads. Although MongoDB can function as a single instance, it is most commonly used as a cluster to optimize performance and reliability.
MongoDB Atlas is a cloud-based service that simplifies the management and deployment of MongoDB clusters. It provides a user-friendly interface and robust tools for creating, configuring, and maintaining clusters with ease.
First of all, we will need to login into MongoDB Atlas at cloud.mongodb.com. Click on the “Create” button and chose cluster type shared which is the free version. Then choose your cloud provider and region and click “Create cluster”.
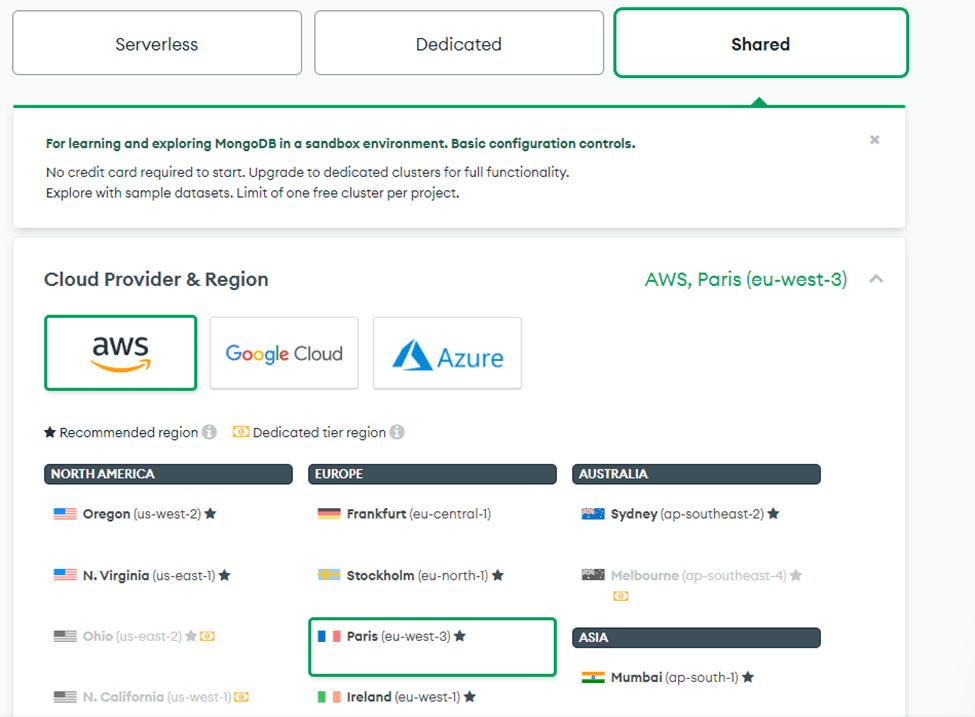
When selecting a configuration for your setup, it’s essential to consider the proximity of the chosen configuration to your location. By choosing a configuration that is closer to your geographic location, you can minimize the delay between your requests and the server. This reduced latency results in faster and more responsive interactions with the server.
To make the best choice, take into account the geographical distance between your location and the available configurations. Consider selecting a configuration that is located in close proximity to you or your target audience. By doing so, you can optimize the performance of your application and ensure that your requests are processed swiftly.
The goal is to achieve an efficient and smooth user experience by minimizing any unnecessary delays caused by long network distances. Once we have the cluster created click on “Connect”.
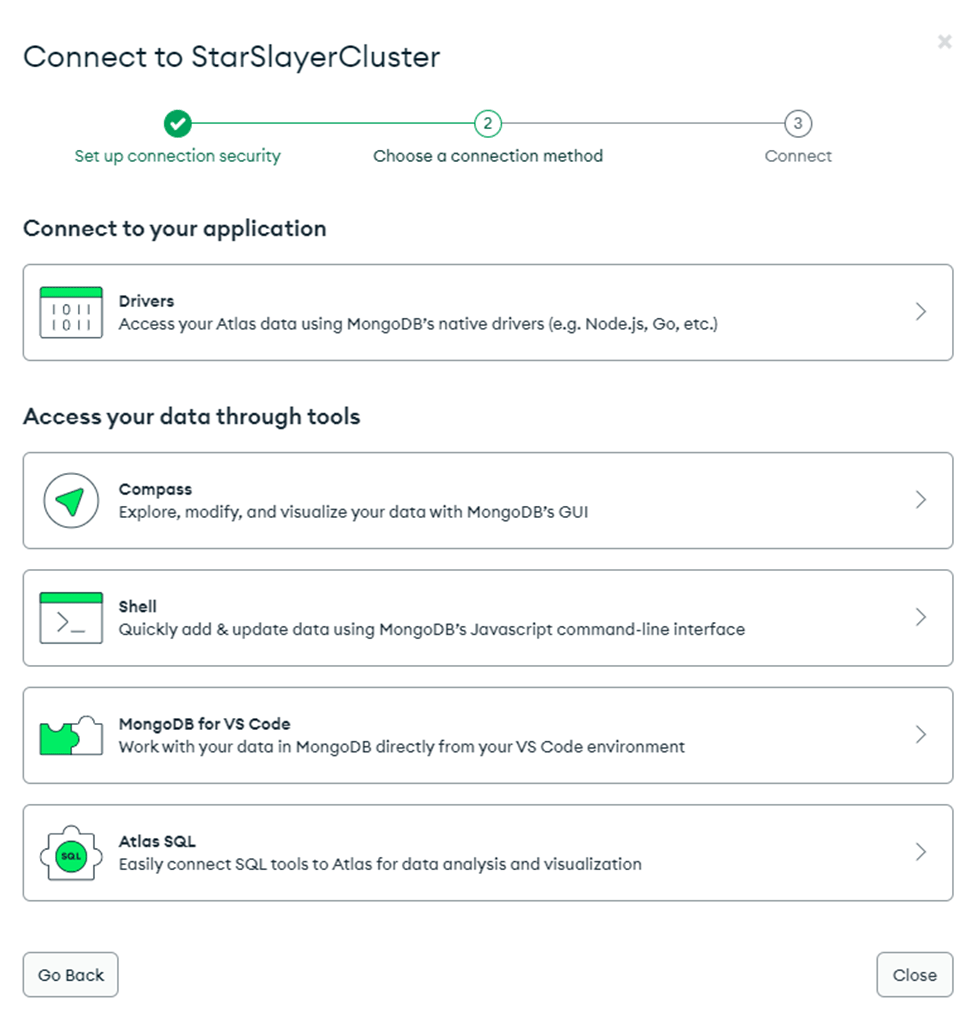
Choose “Drivers” and you will see all the steps needed to connect to our Cluster. The first step is to install MongoDB and Mongoose into our project.
$npm install mongodb
$npm install mongoose
First of all, we are gonna create a .env file to add our keys and strings. This is done to avoid leaks. The .env file may never be pushed to the git repository. To create a password and user go to “Database Accesses” and click add new database user.
DATABASE_URL = mongodb+srv://username:password.dtrnpfj.mongodb.net/?retryWrites=true&w=majorityNow it’s time to add to our server the connection to our database.
const mongoose = require(‘mongoose’)
const mongoString = process.env.DATABASE_URL;

mongoose.connect(mongoString);
const database = mongoose.connection;

database.on('error', (error) => {
    database.collection("player");
    console.log(error)
})

database.once('connected', () => {
    console.log('Database Connected');
})
To get the object from Mongodb we need the same approach we did in Unity. We will create one model that will fit the schema in the database. To do that let’s create a folder called “model” and create a user.js file.
const mongoose = require(‘mongoose);

const userSchema = mongoose.Schema({
    name: {
        required: true,
        type: String
    },
    currency: {
        required: true,
        type: Number
    },
    level: {
        required: true,
        type: Number
    },
})
To use this model we are gonna import it in our index.js and use it to retrieve or update data. Let’s change our post method.
app.post('/user/create', async (req, res) => {

    console.log("[API] ID: ", req.params.id);
    console.log("[API] Procesing...")

    try{
        const response = await UserModel.findOne({"player": req.params.id});
        let result = null;

        if(data)
            result = true;
        else
            result = false;

        console.log("[API] Request finished with SUCCESS");
        console.log("[API] Result: ", result);

        createdUsers.push(newUser);
        console.log(response);
        res.send(response);

    }
    catch(error){
        console.log("[API] Request finished with ERROR:" , error.message);
        res.status(500).json({message: error.message})
    }

});
We are utilizing the functionality provided by the Mongoose library, which offers convenient methods for updating and retrieving data. Specifically, we can make use of the findOne method and the updateOne method.
With the findOne method, we can easily retrieve data from the database by specifying the desired parameter, which in our case is the unique identifier or ID associated with the data we want to retrieve. This method enables us to quickly fetch the relevant data based on the provided ID.
Similarly, the updateOne method allows us to effortlessly update data in the database. By passing in the ID of the data we wish to modify, along with the desired changes, we can easily update the corresponding entry.
Both methods provide a straightforward and streamlined approach to interacting with the database, ensuring efficient data retrieval and manipulation. By utilizing the appropriate method and supplying the necessary ID parameter, we can retrieve and update data with ease, enhancing the functionality and interactivity of our application.
Launch the server again and try it out!
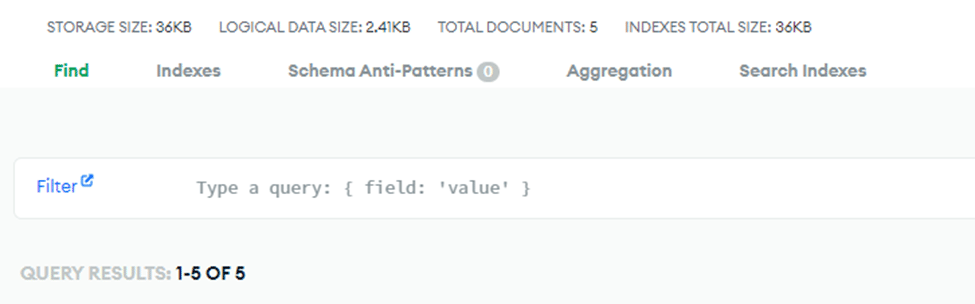
Well done! Now we can see another object added to our database. That’s amazing, we got everything on work.
Conclusion
To recap a little bit we should have three projects with the following structure:
- Node.js project
- Model
- User.js
- Index.js
- .env
- .gitignore
- Package.json
- Model
- Unity project
- TestClient
- KeyUtils
- User
- Mongodb
- TestCluster
- User collection
- TestCluster
Now we know how retrieving and updating data from a Node.js server works. Moreover, you have gained the ability to create a MongoDB database, all free of cost. This newfound capability empowers you to add and manage any data you desire within the database.
The implications of this achievement are remarkable, particularly in the realm of online gaming. With the ability to store and manipulate data in a MongoDB database, you can now create captivating online games that offer engaging user experiences. The possibilities are truly incredible.