Here’s a stat that keeps payment engineers up at night: 47% of developers say their first payment integration took longer than expected, and 23% experienced critical bugs in production within the first month. I’ve seen teams burn weeks on what should be a weekend project — not because payment APIs are inherently complex, but because most guides skip the hard parts.
In this guide, I’ll walk you through payment gateway integration the way it actually works in production. No fluff. No “hello world” examples that fall apart under real load. Just battle-tested patterns from systems processing millions in transactions.
What Is Payment Gateway Integration?
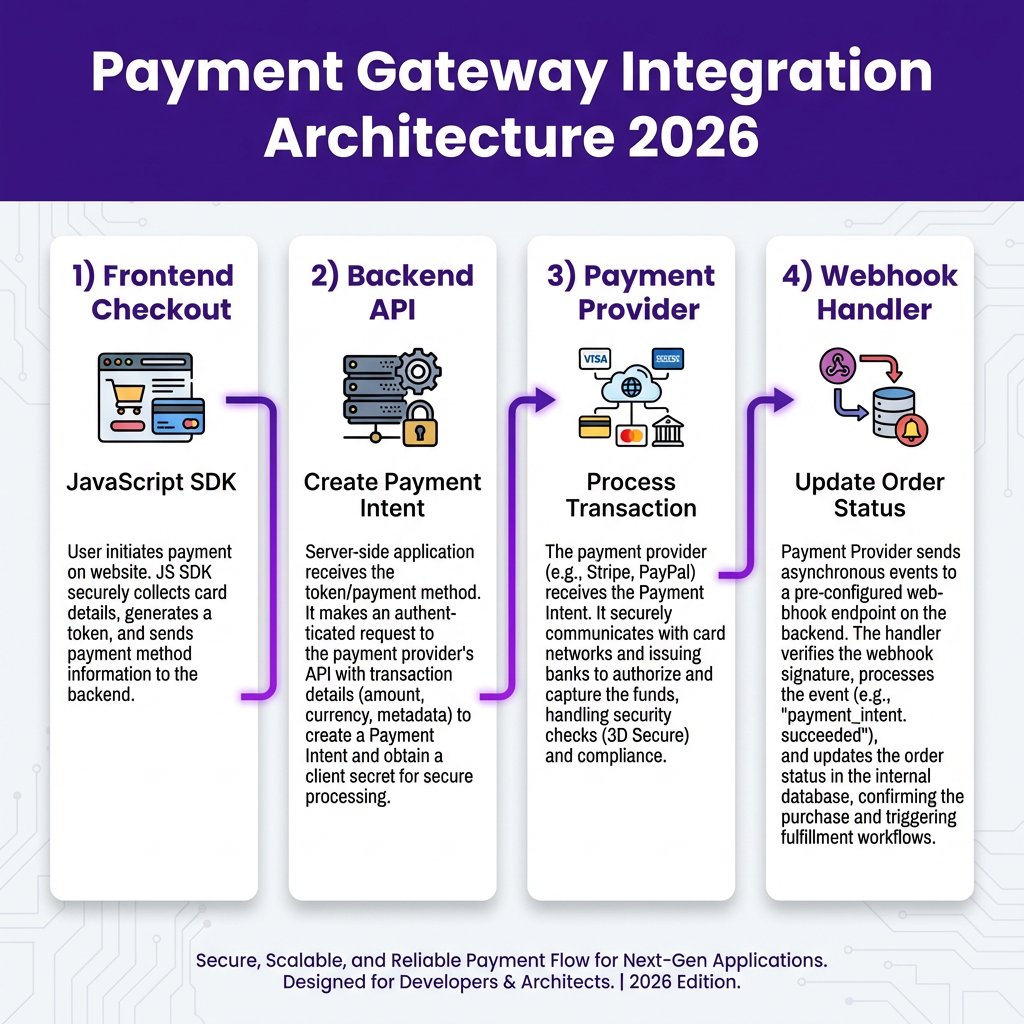
Payment gateway integration is the process of connecting your application to a payment processor’s API to accept, process, and manage online transactions. It sounds simple — send some data, get a response, update your database. But the reality is a distributed systems problem involving order lifecycle management, cryptographic webhook verification, idempotency enforcement, and failure recovery.
Here’s what actually happens when a customer clicks “Pay Now”:
- Your frontend collects payment details (or uses a pre-built component)
- Your backend creates a payment intent/order with the provider
- The provider processes the transaction through card networks
- Asynchronous webhooks notify your system of the final status
- You update order state, trigger fulfillment, and handle edge cases
Each step has failure modes most tutorials ignore. That’s why this guide exists.
Why Payment Integration Matters More Than Ever
The global digital payments market hit $11.5 trillion in 2025 and is projected to reach $17.5 trillion by 2028. For SaaS and digital product businesses, payment integration isn’t a feature — it’s the core infrastructure that turns code into revenue.
But here’s what the growth numbers don’t tell you: payment integration failures are expensive. A single bug in your checkout flow can cost thousands in lost revenue per hour. A webhook handling error can double-charge customers or fail to deliver purchased products. In my experience, the teams that treat payments as “just another API” are the ones scrambling at 2 AM when things break.
The stakes are higher now because customer expectations have shifted. According to Visa’s 2025 Global Digital Shopping Index, 56% of shoppers specifically choose merchants that offer fast, frictionless payments. Your integration isn’t just about accepting money — it’s about conversion rates, customer trust, and competitive positioning.
Choosing Your Payment Integration Approach
Before writing code, you need to decide on your integration architecture. There are three main approaches, each with different trade-offs:
1. Hosted Checkout (Redirect Flow)
The customer is redirected to the payment provider’s page to complete the transaction, then sent back to your site. This is the simplest approach — the provider handles PCI compliance, fraud detection, and the entire UI.
Best for: MVPs, low transaction volumes, teams without dedicated payment engineering resources.
Trade-off: You lose control over the user experience. Conversion rates typically drop 10-15% compared to embedded flows.
2. Embedded Components (Stripe Elements, etc.)
Pre-built UI components that you embed in your checkout page. The provider still handles sensitive card data, but the experience feels native to your app.
Best for: Most SaaS applications, balancing customization with compliance.
Trade-off: Less flexible than fully custom builds, but significantly faster to implement.
3. Direct API Integration
You build the entire payment UI and communicate directly with the provider’s API. This gives maximum control but requires handling PCI compliance yourself (or using a tokenization service).
Best for: Large enterprises with specific UX requirements, companies with dedicated compliance teams.
Trade-off: Highest complexity. You’ll spend weeks on compliance alone.
Step-by-Step Payment Gateway Integration
Now let’s get into the actual implementation. I’ll use pseudo-code that translates to any major provider (Stripe, Paddle, Fungies, etc.), but the patterns apply universally.
Step 1: Create the Order Before the Payment
This is the most common mistake I see. Developers create the payment intent first, then try to associate it with an order. Don’t do this. Always create your order record first, then initiate the payment with a reference to that order.
// CORRECT: Create order first
order = await db.orders.create({
  userId: user.id,
  amount: 99.00,
  currency: 'USD',
  status: 'pending',
  items: cart.items
});

// Then create payment with order reference
paymentIntent = await paymentProvider.createIntent({
  amount: order.amount,
  currency: order.currency,
  metadata: { orderId: order.id }  // Critical for webhook matching
});
Why does this matter? If the payment succeeds but your server crashes before you can record it, you have an orphaned transaction. With the order-first approach, webhooks can always reconcile the state.
Step 2: Handle the Client-Side Flow
For embedded components, you’ll initialize the payment form with the client secret from your backend:
// Frontend JavaScript
const result = await paymentComponent.confirmPayment({
  clientSecret: paymentIntent.client_secret,
  paymentMethod: { /* card details or saved method */ }
});

if (result.error) {
  // Show error to customer
  showError(result.error.message);
} else {
  // Payment submitted — DON'T fulfill yet!
  // Wait for webhook confirmation
  showPendingState();
}
Notice that even on “success,” we don’t fulfill the order yet. The client-side success only means the payment was submitted — not that it completed. Cards can still be declined asynchronously.
Step 3: Implement Webhook Handling (The Critical Part)
Webhooks are where most integrations fail. Here’s a production-ready webhook handler structure:
// Webhook endpoint
app.post('/webhooks/payment', async (req, res) => {
  // 1. Verify webhook signature (CRITICAL)
  const isValid = verifyWebhookSignature(
    req.body,
    req.headers['signature'],
    webhookSecret
  );

  if (!isValid) {
    return res.status(401).send('Invalid signature');
  }

  // 2. Acknowledge immediately — don't process synchronously
  res.status(200).send('Received');

  // 3. Queue for async processing
  await queue.add('process-webhook', {
    event: req.body,
    receivedAt: Date.now()
  });
});
Key points here: verify the signature to prevent spoofing, return 200 immediately so the provider doesn’t retry, and process asynchronously to avoid timeouts.
Step 4: Process Webhooks Idempotently
Your webhook processor needs to handle duplicate events, partial failures, and race conditions:
// Async webhook processor
async function processWebhook(event) {
  const eventId = event.id;

  // 1. Check if already processed (idempotency)
  const existing = await db.webhookEvents.findUnique({
    where: { eventId }
  });

  if (existing) {
    console.log(`Event ${eventId} already processed`);
    return;
  }

  // 2. Record that we're processing this
  await db.webhookEvents.create({
    eventId,
    type: event.type,
    processedAt: new Date()
  });

  // 3. Handle the specific event type
  switch (event.type) {
    case 'payment.succeeded':
      await fulfillOrder(event.data.orderId);
      break;
    case 'payment.failed':
      await markOrderFailed(event.data.orderId, event.data.failureReason);
      break;
    // Handle other event types...
  }
}
5 Critical Payment Integration Mistakes (And How to Avoid Them)
After reviewing dozens of payment integrations, I’ve identified the same failures appearing repeatedly. Here’s what to watch out for:
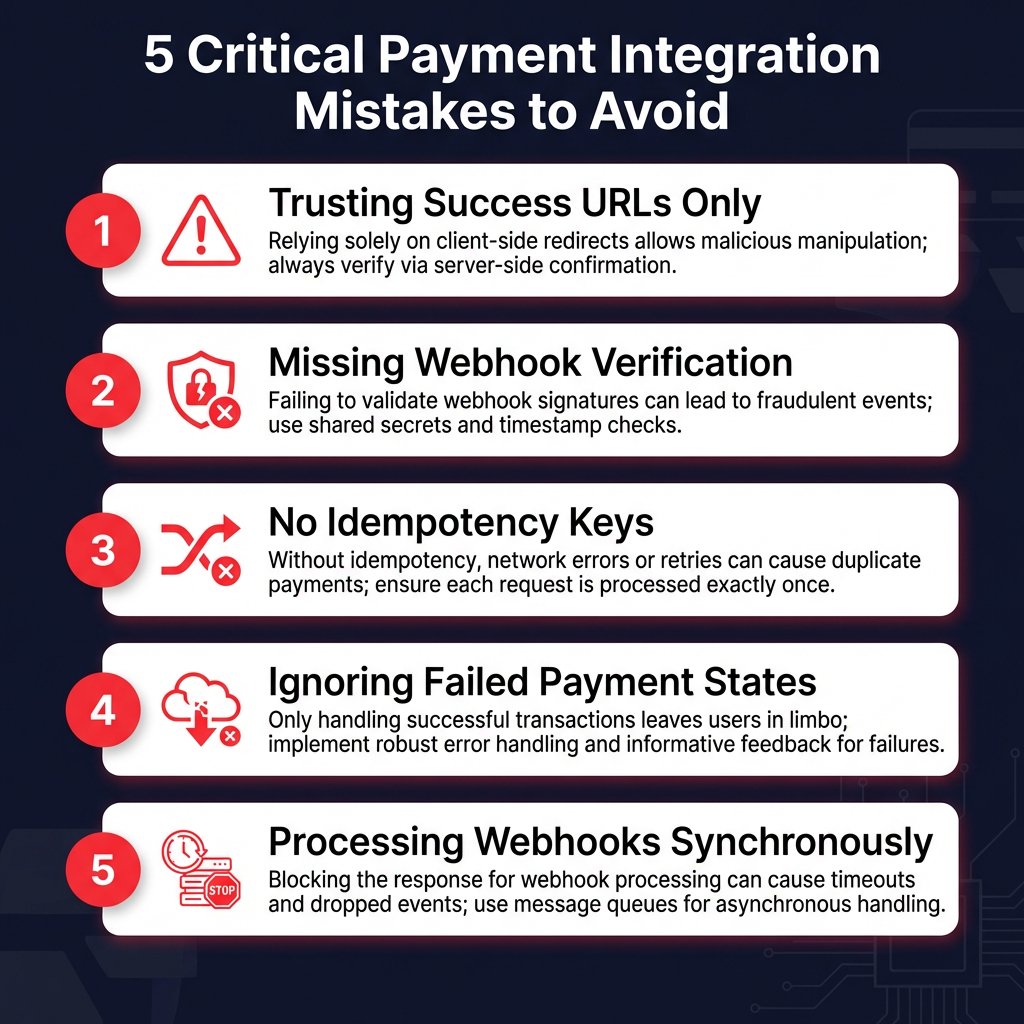
Mistake 1: Trusting the Success URL
Many developers redirect to a “success” page after the client-side payment completes and treat this as confirmation. This is wrong. The success URL is a UX signal only — it should display a “Payment processing, please wait” state while your backend waits for the webhook.
I’ve seen teams fulfill orders based on the success page load, only to discover later that some “successful” payments were actually declined during asynchronous processing.
Mistake 2: Not Verifying Webhook Signatures
Without signature verification, anyone can send fake webhooks to your endpoint. This is a security vulnerability that could allow attackers to create fake payments and receive products for free. Always verify webhook signatures using the provider’s SDK or documented algorithm.
Mistake 3: Missing Idempotency Keys
Network timeouts happen. If your request to create a payment times out, you don’t know whether it succeeded or failed. Without idempotency keys, retrying could create duplicate charges. Always include an idempotency key (usually your order ID) on mutation requests.
Mistake 4: Ignoring Failed Payment States
Systems that handle invoice.paid but not invoice.payment_failed quietly keep users on paid tiers after card declines. You need handlers for every event type your system can receive, including failures, disputes, and refunds.
Mistake 5: Processing Webhooks Synchronously
If your webhook handler takes more than a few seconds to respond, the provider may timeout and retry — potentially causing duplicate processing. Always return 200 immediately and process the event asynchronously.
Payment Gateway Comparison for Developers
Here’s how the major providers compare for developer experience:
| Provider | Developer Experience | Pricing | Tax Handling | Best For |
|---|---|---|---|---|
| Stripe | Excellent API, extensive docs | 2.9% + $0.30 + extras | Self-managed (Stripe Tax adds 0.5%) | Teams wanting full control |
| Paddle | Good, MoR simplifies compliance | 5% + $0.50 (all-inclusive) | Fully handled | SaaS wanting hands-off tax |
| Fungies | Clean REST API, fast setup | 5% + $0.50 (all-inclusive) | Fully handled | Indie devs & early-stage SaaS |
When you factor in Stripe Tax (0.5%), currency conversion (1-2%), and the engineering cost of building tax compliance yourself, the effective cost difference between Stripe and MoR providers like Paddle or Fungies often disappears for international businesses.
Testing Your Payment Integration
A payment integration that works in a demo often fails in production. Here’s my testing checklist:
Sandbox Testing
- Simulate successful transactions with test cards
- Test failed payments (insufficient funds, expired cards)
- Try different payment methods (cards, wallets, bank transfers)
- Validate edge cases (zero-amount transactions, currency conversions)
Webhook Testing
- Verify webhook signature validation works
- Test retry behavior (return errors, verify retries)
- Validate idempotency (same event processed only once)
- Ensure timely responses (always under provider timeout limits)
Error Handling & Recovery
- Map all status codes (2xx success, 4xx client errors, 5xx server errors)
- Implement retry logic with exponential backoff
- Use idempotency keys on all mutation requests
- Show clear error messages to users
Concurrency Testing
- Simulate multiple simultaneous checkouts
- Test double-click scenarios during payment
- Verify payment state consistency under load
- Prevent duplicate charges from race conditions
FAQ: Payment Gateway Integration
How long does payment gateway integration take?
A basic integration can be done in a day. A production-ready integration with proper error handling, webhook processing, and testing typically takes 1-2 weeks for an experienced developer. Complex scenarios like subscription billing, usage-based pricing, or multi-party payments can extend this to 4-6 weeks.
Do I need to handle PCI compliance myself?
If you use hosted checkouts or embedded components from providers like Stripe, Paddle, or Fungies, they handle PCI compliance for you. If you build a direct API integration where your servers touch raw card data, you’ll need PCI DSS compliance — which typically requires annual audits and significant security infrastructure.
What’s the difference between a payment gateway and a merchant of record?
A payment gateway (like Stripe) processes transactions but you remain the legal merchant responsible for tax compliance, chargebacks, and regulatory issues. A Merchant of Record (like Paddle or Fungies) becomes the legal seller, handling all tax, compliance, and liability on your behalf. MoR providers charge higher fees but eliminate significant operational overhead.
How do I handle payment failures gracefully?
Always create your order before initiating payment so you have a record to update. Use webhooks as the source of truth for payment status, not client-side callbacks. Implement clear error messaging for users (“Your card was declined — try a different payment method” rather than generic errors). And have a process for manually reviewing edge cases that automated systems can’t handle.
Should I build my own payment system or use a provider?
Unless you’re a massive enterprise with dedicated payment engineering and compliance teams, use a provider. Building payment infrastructure from scratch requires relationships with acquiring banks, PCI compliance audits, fraud detection systems, and ongoing regulatory monitoring. The 2.9-5% you pay providers is far cheaper than building and maintaining this yourself.
Conclusion: Build Payments That Scale
Payment gateway integration is one of those things that seems simple until it isn’t. The difference between an integration that works in a demo and one that holds up in production comes down to a few precise decisions: creating orders before gateway interaction, verifying webhooks cryptographically, writing idempotent event handlers, and designing for the failure cases you’ll absolutely encounter.
If you’re building a SaaS or digital product business and want to get payments right the first time, consider using a Merchant of Record like Fungies. You get the full payment stack — tax compliance, fraud protection, global payments — with a clean API that lets you focus on your product instead of payment infrastructure. Sign up free and get your first sale live today.